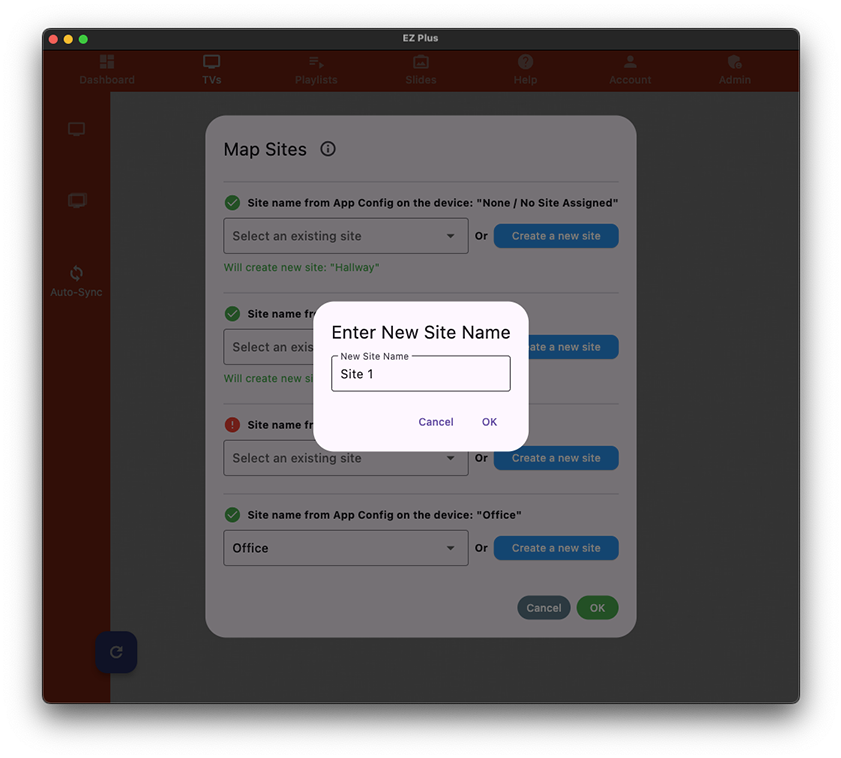
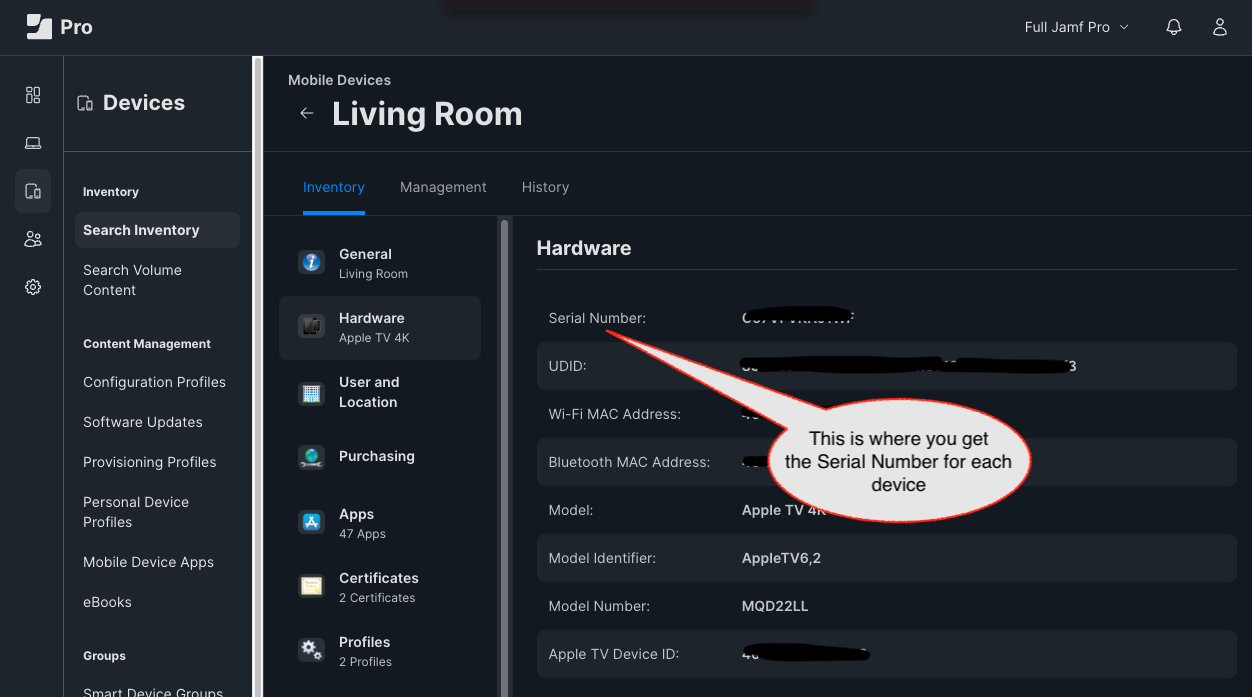
Our Service has two parts to it. A Management application and a Display application. You will also need to have some sort of display/TV/monitor/projector to connect to the Apple TV device.
The EZ+ Management application is currently available on the following platforms (if your favorite platform is not listed here, please contact us):
- Web: app.eztv.plus
- iOS (iPhone, iPad): You can search for “ez plus” in the Apple App Store on your device or follow this link. The bundle ID is “bnm.eztv-phone“.
- macOS (all Mac and Macbook models): You acn search for “ez plus” in the Apple App Store on your device or follow this link. The bundle ID is “bnm.eztv-phone“.
The EZ+ Display application is currently only available on Apple TV App Store. You can search for “ez plus” on the Apple TV App Store to find our application. The bundle ID of the Apple TV app is also “bnm.eztv-phone”.
If you are deploying your devices where there is a firewall/VPN, please whitelist the following addresses so that our services are reachable from the Apple TV devices:
- www.ezplus.app
- app.eztv.plus
- www.eztv.plus
- www.ezplus.app:8080
- app.eztv.plus:8080
- www.eztv.plus:8080
You will also need to have some sort of display/TV/monitor/projector to connect to the Apple TV device. For displays, we recommend models that support CEC to make it easier to turn on/off the display when turning on/off the Apple TV. Note that you can use any display that can connect to the HDMI output of the Apple TV device; in addition to HDMI-to-HDMI cables, you can also fine HDMI to DisplayPort cables.
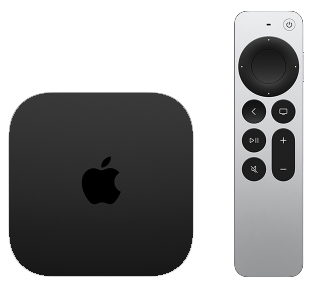
Apple TV 4K (3rd Gen) is our recommended model for the best performance, and image/video codec support.
Apple TV 4K (3rd Gen)
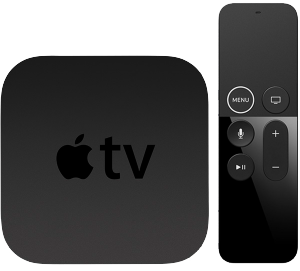
Apple TV HD (2015) is the oldest model of Apple TV that we support. However this model does not play 4K videos and have limited support for modern image and video codecs.
Apple TV HD
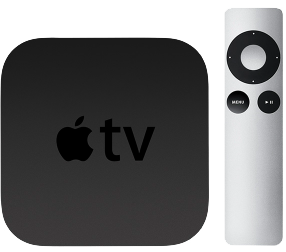
Apple TV 3rd gen and older models are NOT supported as they lack App Store capability.
Apple TV 3rd Gen
1- The EZ Plus management app is available through the following
- Web: available at app.eztv.plus which is also the DASHBOARD menu tab on this website.
- iOS/macOS (iPhone/iPad/Mac): search for “ez plus” in the App Store on your device and download the Management App. Here’s a link for you to the our App Store page.
The functionalities of the Web and iOS/macOS application are identical and we have worked hard to keep those applications consistent so that you will have a seamless experience working on different platforms.
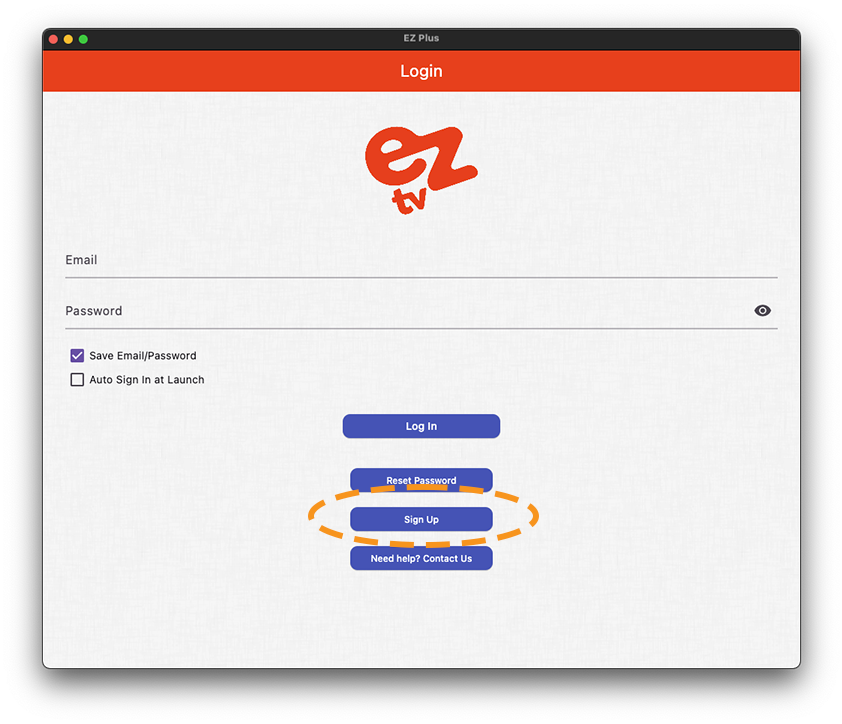
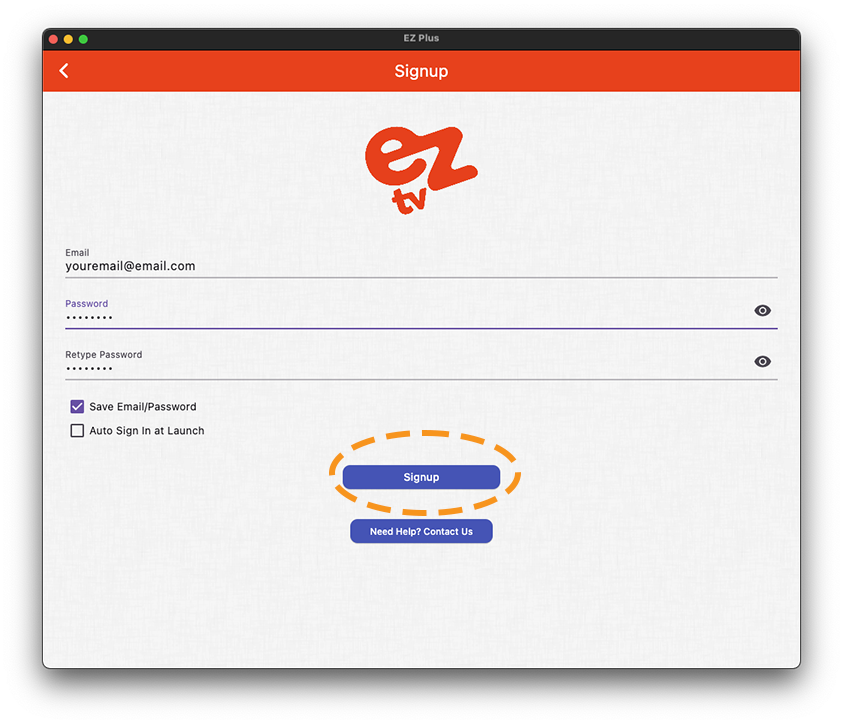
After downloading the Management App or using the web portal, create an account for yourself by clicking on sign-up on the landing page and filling in the sign-up form and submitting it. Note that you should use an email address that you have access to as password resets and other communications related to your account will be send to the email you have used in the sign-up process.
- If you want the Management app to remember your login information, check the “Save Email/Password” box
- If you want the Management app to automatically log you in with the saved credentials when you launch the Management app, check the “Auto Sign in at Launch” box
1.a- Navigate to https://app.eztv.plus or open the EZ+ app
1.b- Fill in your information and hit Signup
2- Playlists:
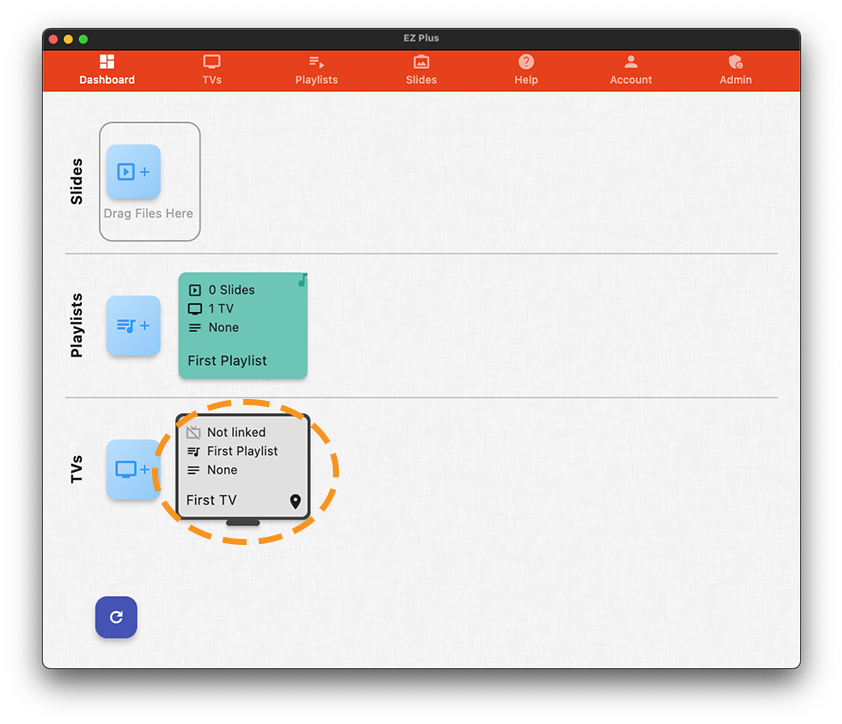
Once you login, you notice that we have already created a Playlist and a TV for you. Note that there are no Slides created yet.
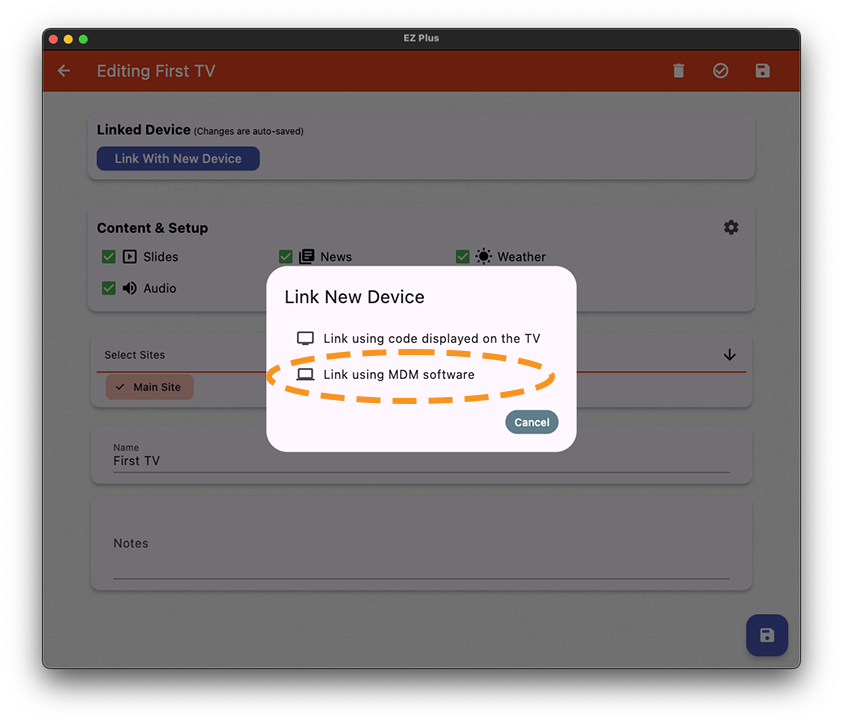
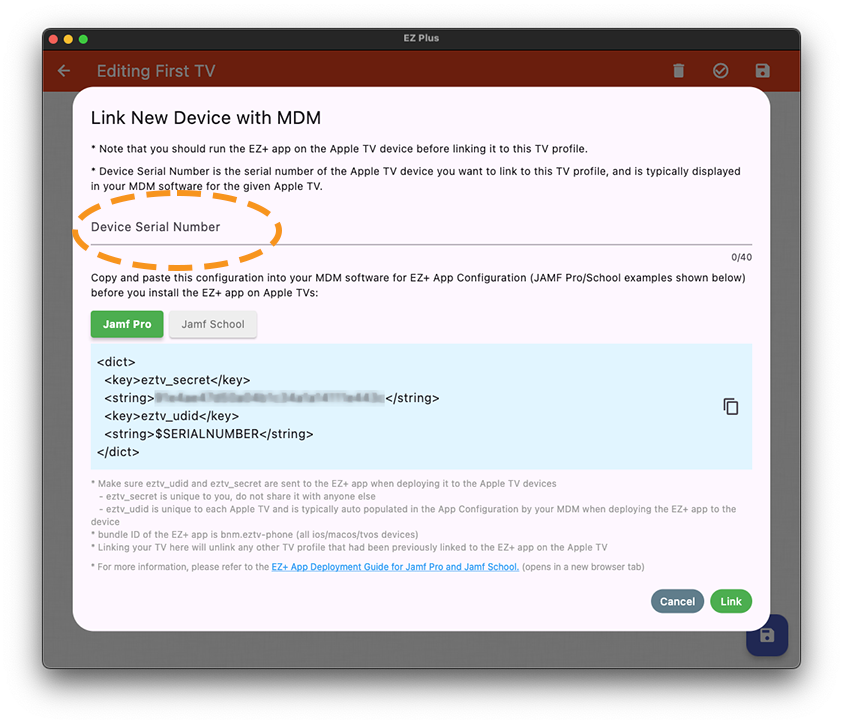
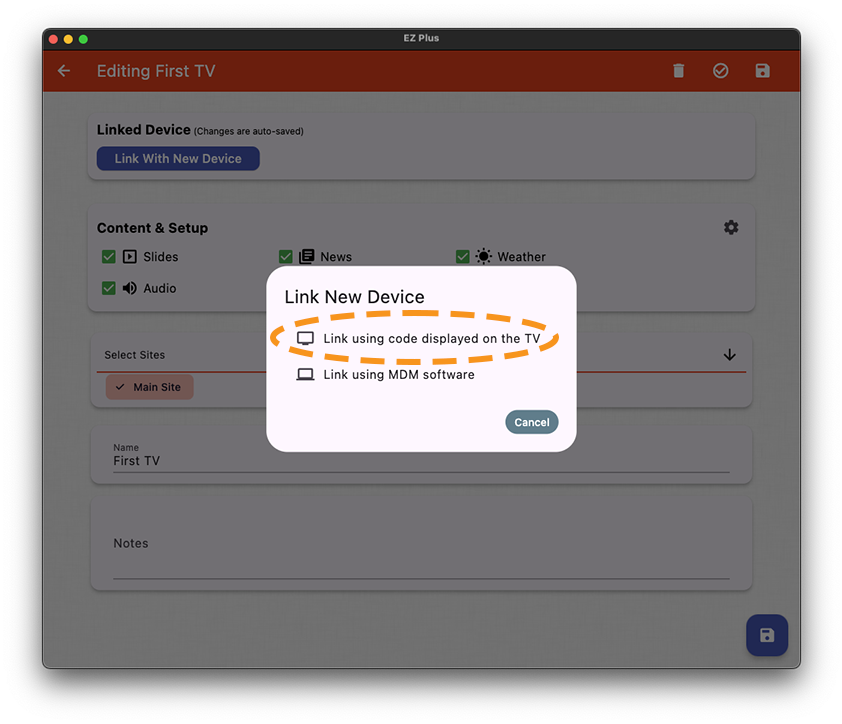
Click on the TV object to navigate you to the form page for that TV, then lick on “Link With New Device”, and select “Link using code displayed on the TV”
2.a- Select the TV object you want to link to the TV app
2.b- Select “Link With New Device”
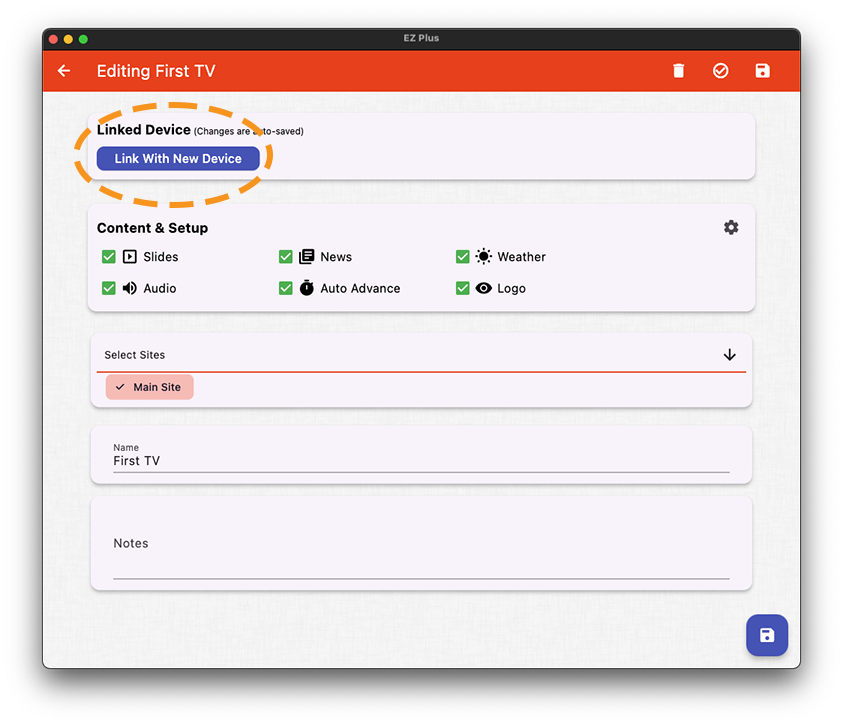
2.c- Select “Link using code displayed on the TV”
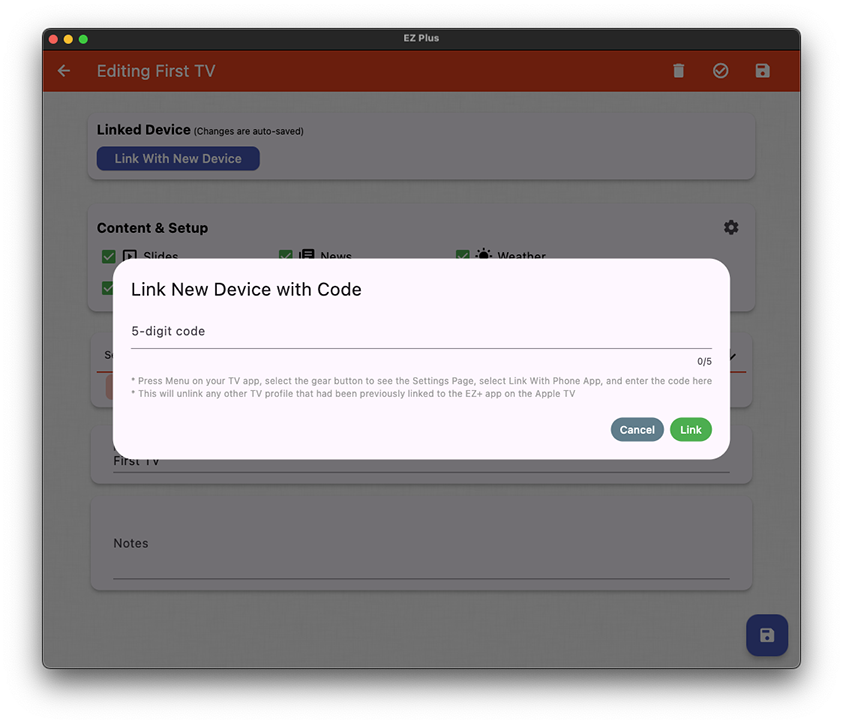
2.d- We will enter the code displayed on the TV here later on
3- Setting up Apple TV
Now it is time to setup your Apple TV. When setting up your Apple TV device, make sure
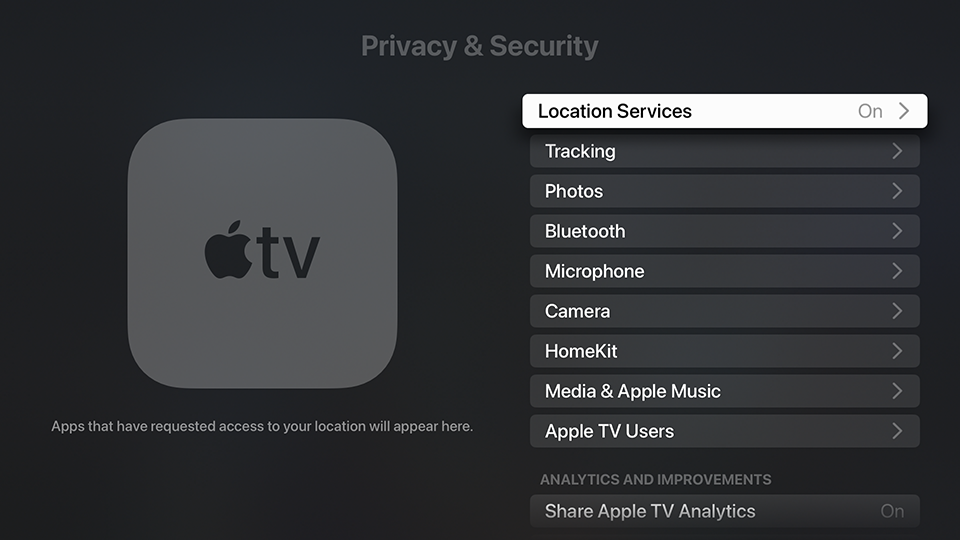
- “Location Services” is turn on in Settings –> General –> Privacy & Security –> Location Services. This will let us show the correct Time/Date and Local Weather in the EZ+ app
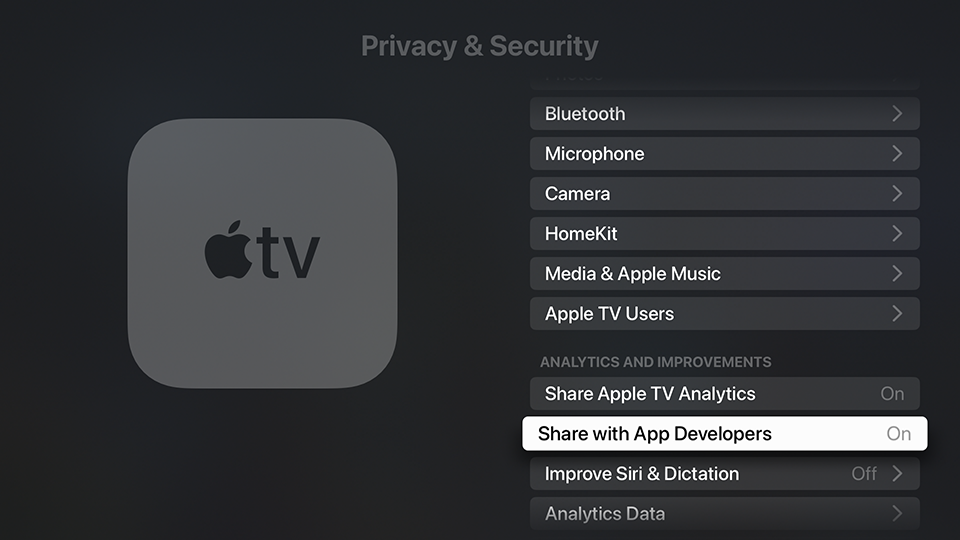
- “Share Apple TV Analytics” and “ Share with App Developers” is turn on in Settings –> General –> Privacy & Security under “ANALYTICS AND IMPROVEMENTS. This will help us debug any crash issues that might happen when using the EZ+ app
4- Downloading ez plus from App Store on your Apple TV device
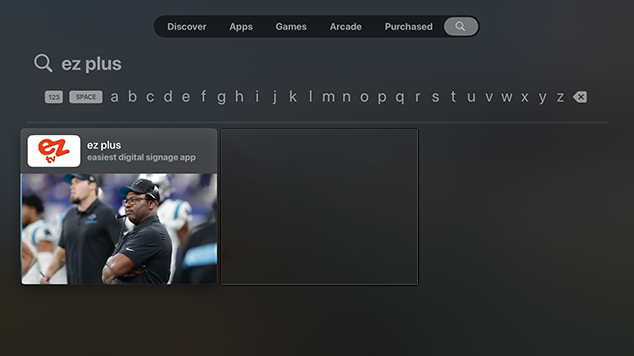
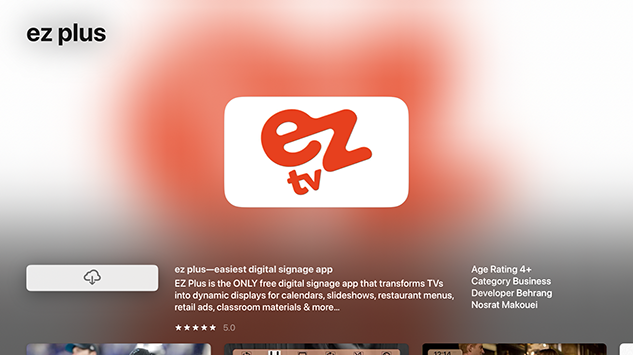
Go to the App store on your Apple TV, and search for “ez plus”, and download the app on your Apple TV device
4.a- Search for EZ-Plus on App Store on your Apple TV device
4.b- Download ez plus to your device
5- Linking the ez plus app on Apple TV
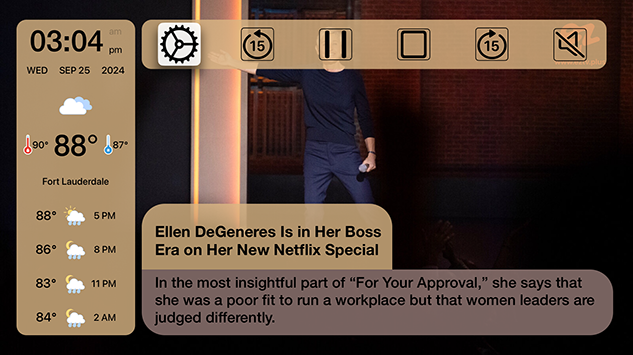
Open the EZ+ app on your Apple TV, press the menu button on your remote once to see the menu options on the top bar and select the gear icon. This will take you to the Settings page on our TV application.
In the Settings Page, click on “Link with Management App” and wait for the linking code to appear on this page. Note that his code is unique to you and will expire to 15 minutes. When the code is expired, the TV app
will automatically pull a new unique code for you.
5.a- Open the TV app and go to the settings page
5.b- Select “Link With Management App”
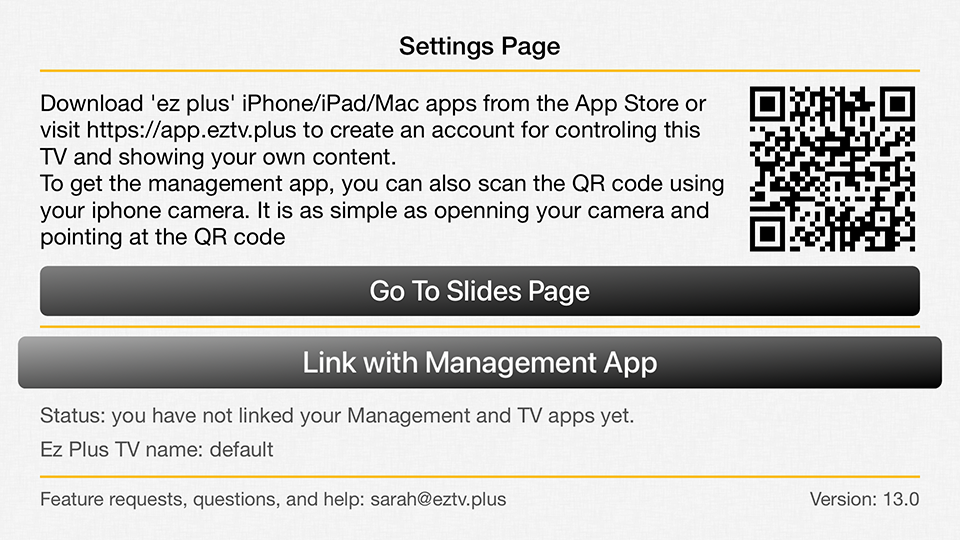
5.c- Wait for the linking code to appear
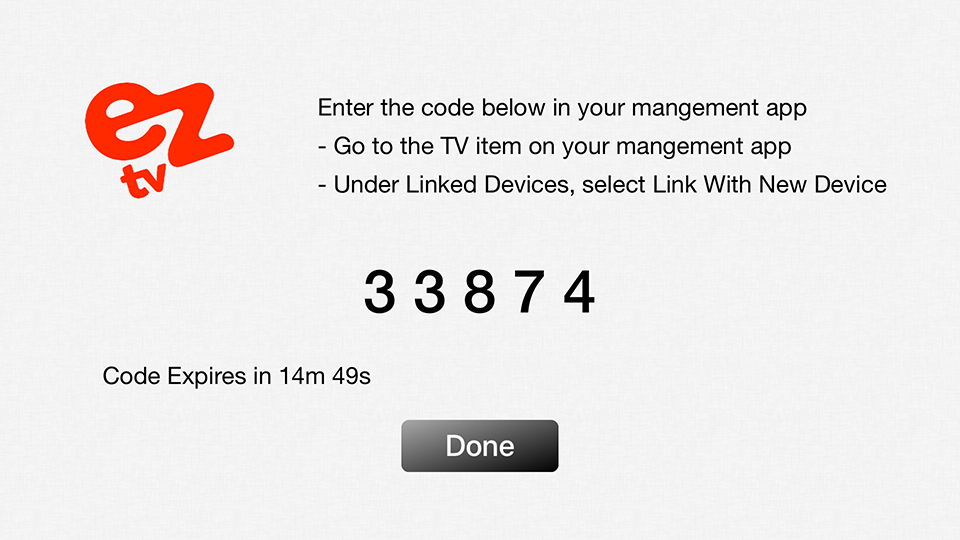
6- Using the pairing code
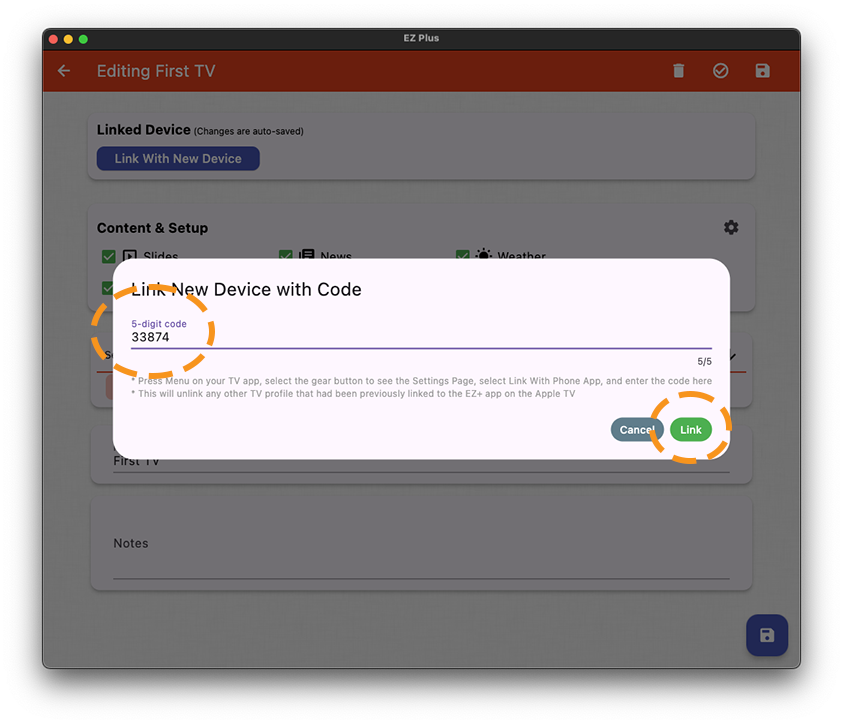
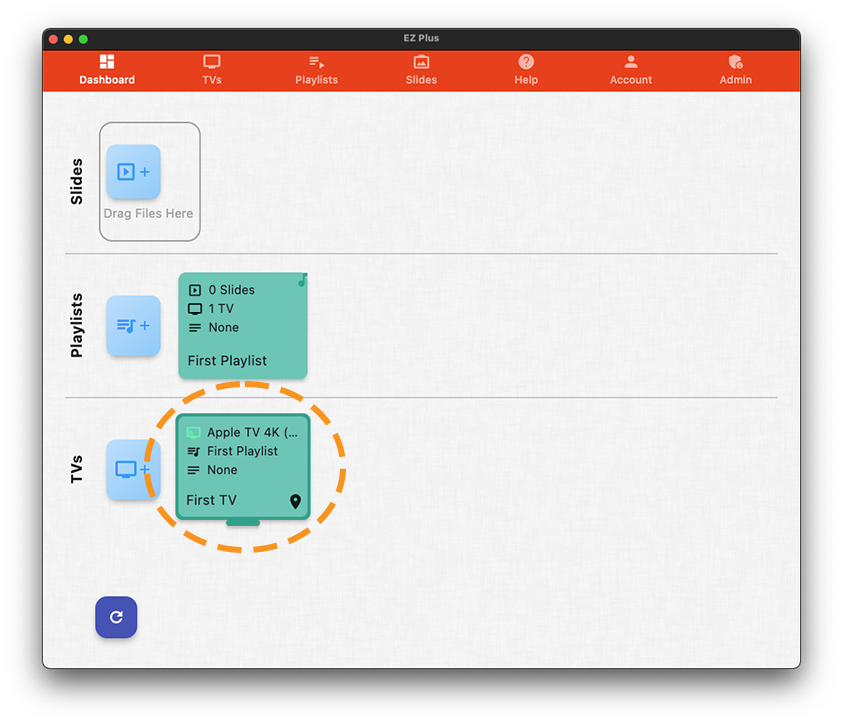
Note down the code shown on the TV and enter it in the box in the Management App and hit Link. After linking is successful, your TV will show as linked on the TV form page. Hit “Save & Exit” on the top right corner of the form to exit the form. Notice how the first TV will now have a background of green indicating it is linked and online. A background of red means the TV is linked and offline and a background of orange means the TV is linked, online, and requires a EZ+ App update on the device
6.a- Enter the code from the TV and “Link”
6.b- Save & Close the TV form
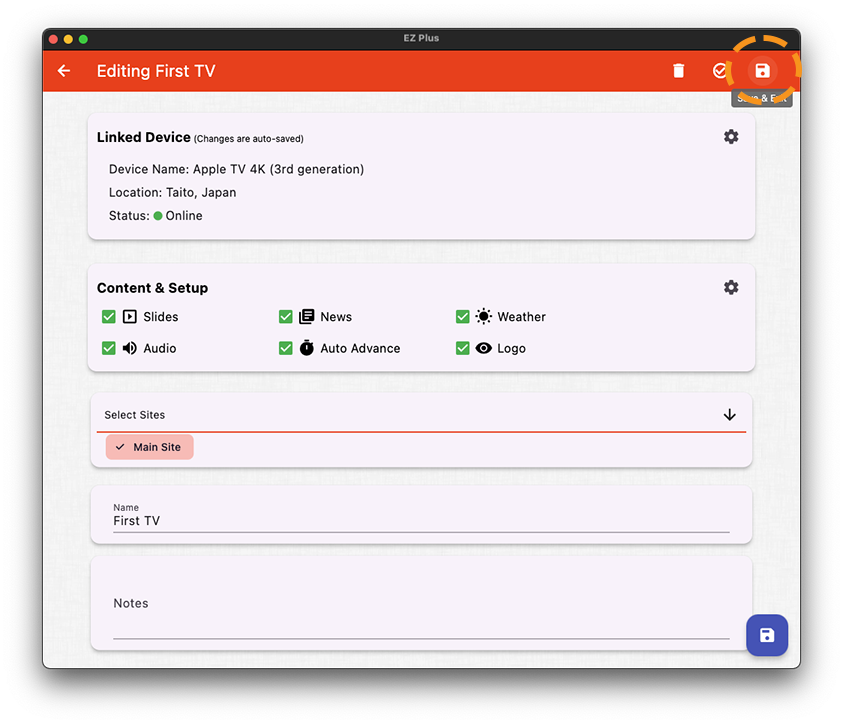
6.c- Your first TV is linked now!
We assume you have setup your Apple TV(s) and have linked it to your EZ+ management application. Let’s create a simple image slide.
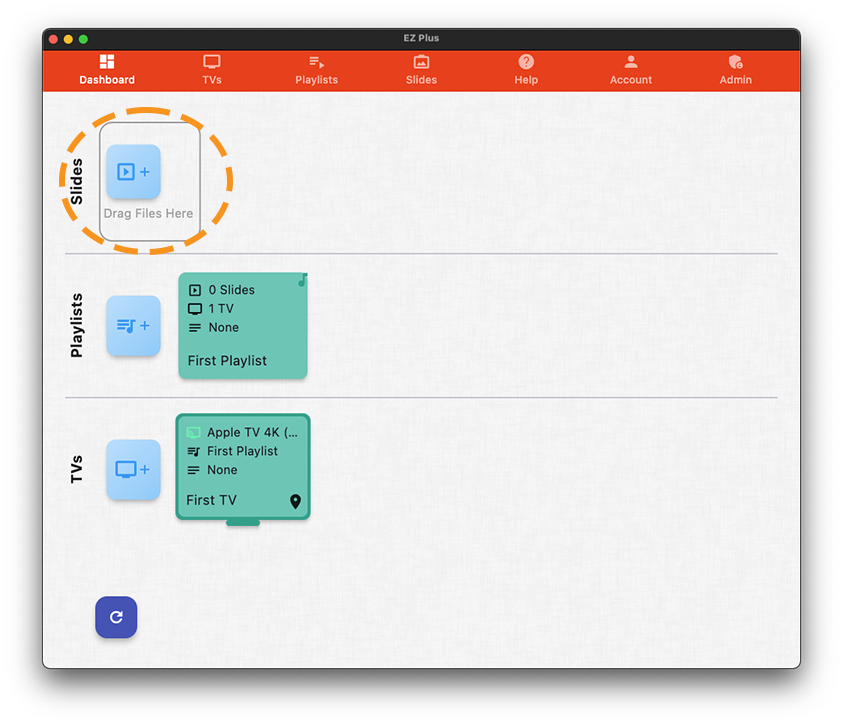
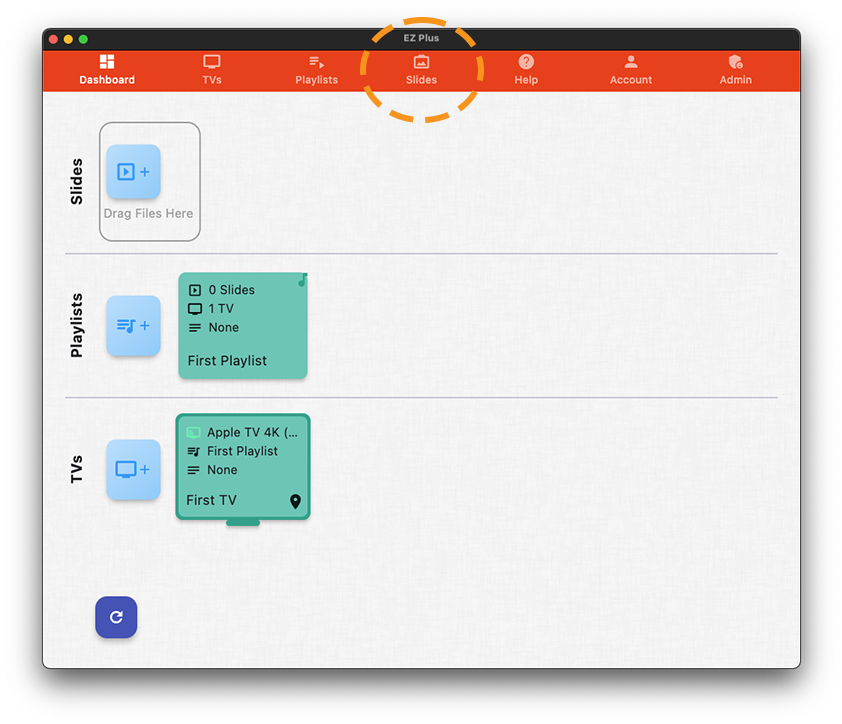
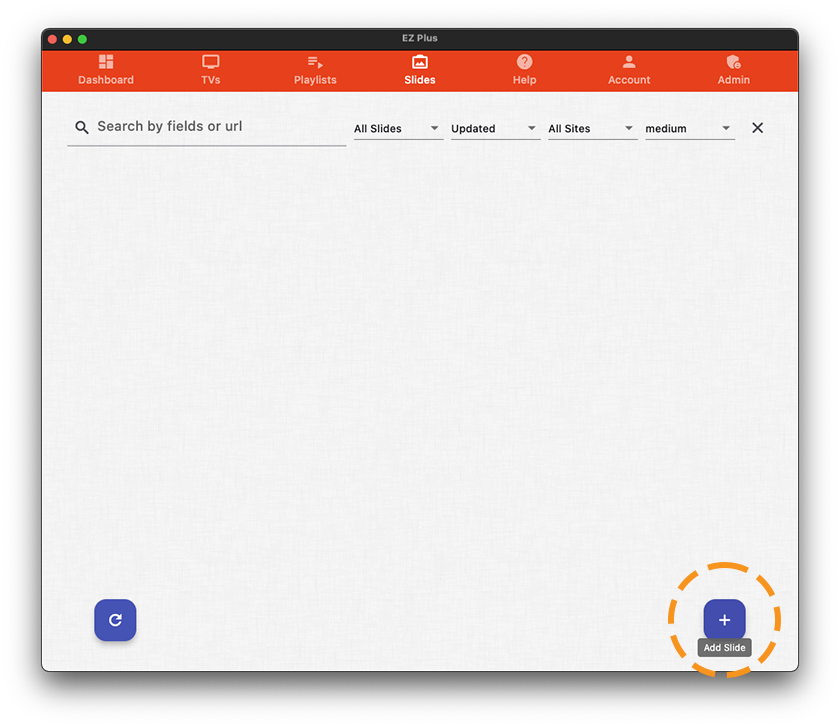
1- Open your EZ+ management application and either click on the + sign in the Slides row (you can also drag the image file to this area), or navigate to the Slides tab and click on the + button in the lower right corner of the screen to create a new slide
1.a- click on + or drag files here
1.b or navigate to the slides tab first
1.c click on the lower right + button
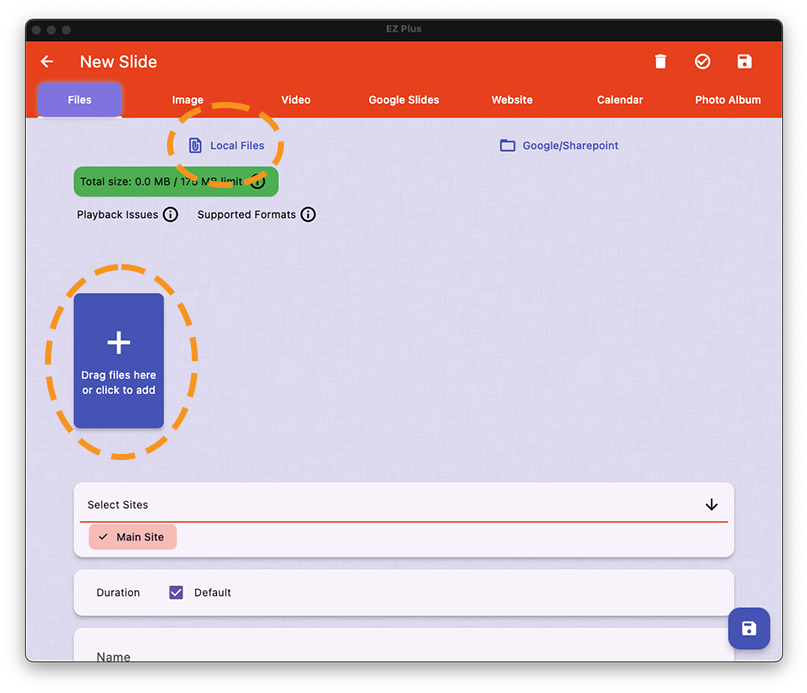
2- When starting a new slide, you will be automatically taken to the Files tab in the slide form. We want to add an local file image, so we are in the right place.
click on the Local Files button or the big + button to open the file selection menu
2.a- click on Local Files or the + sign
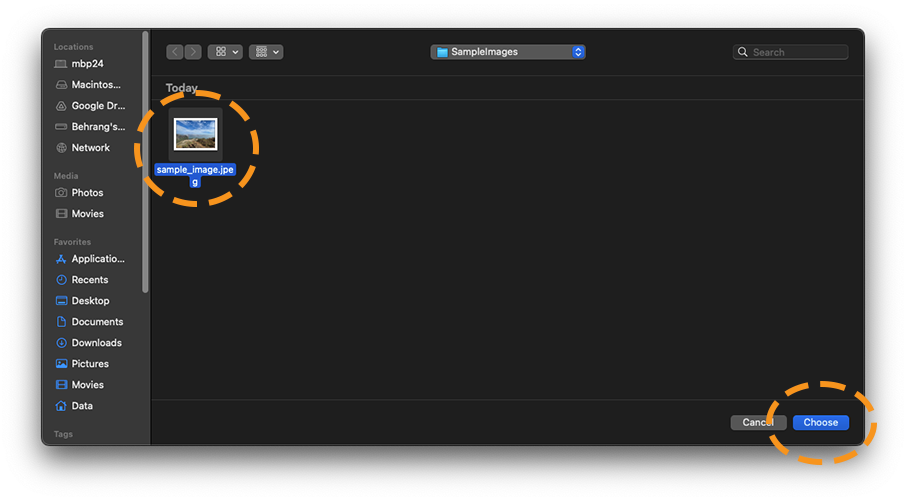
2.b- pick one or multiple image(files)
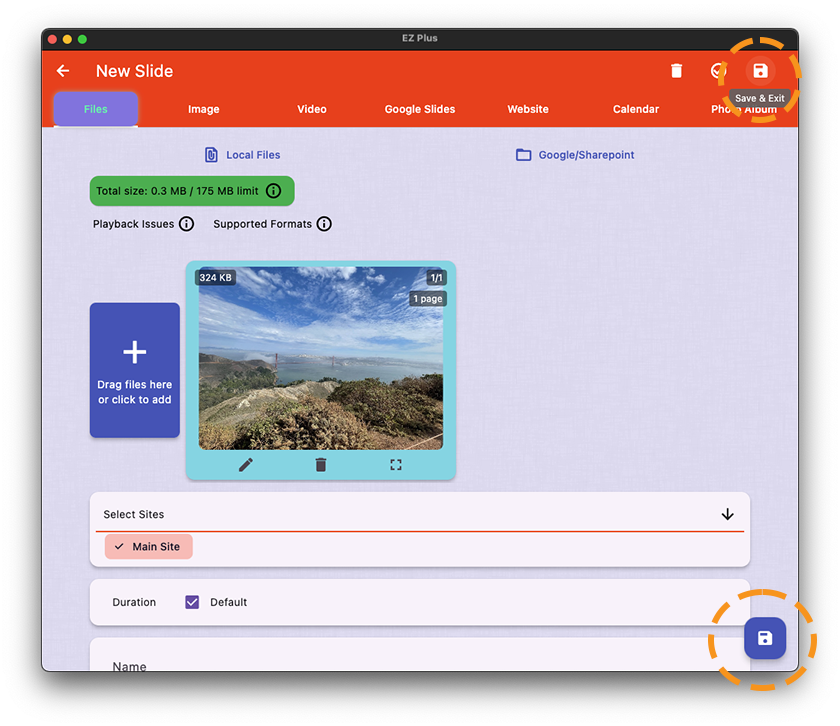
3- Now that you have selected your image, it will appear in the your slide form. If you don’t want to make any modification to the images, save the slide by clicking on “Save and Exit”.
3.a- Click on Save and Exit after picking the image
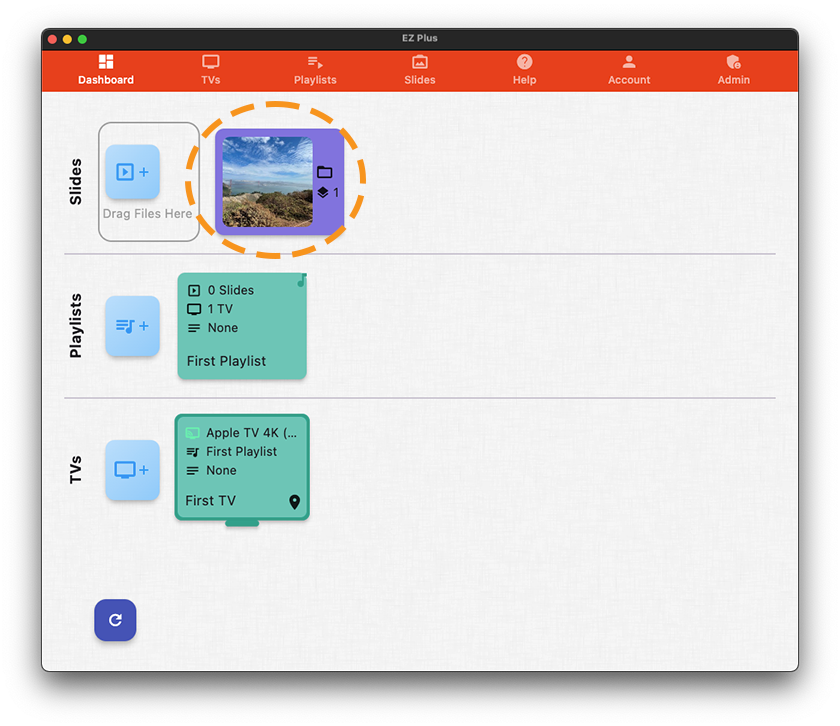
3.b- you have created your first slide!
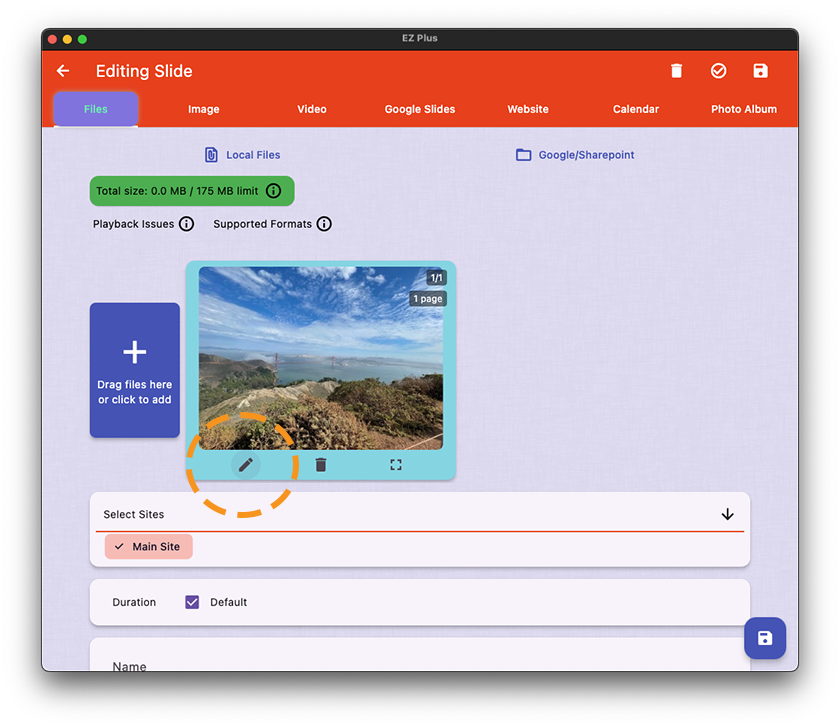
4- If you want to crop an image, we have to do some extra steps after selecting an image. Let’s say you have loaded the image as in above and now see the image as in Fig 3.a. Next we have to click on the edit button on the media navigator to crop the image
4.a- Click on edit on the image you want to modify (crop for example)
4.b- Now we are in the image crop screen
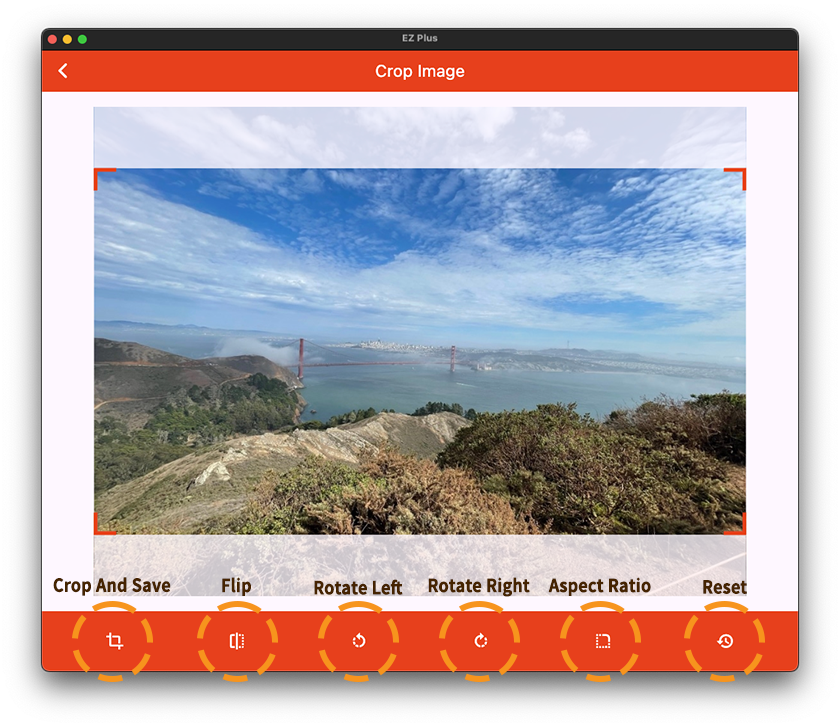
In the Crop Image window, you have some controls buttons such as Flip, Rotate Left/Right, Reset, Crop & Save, and Change Aspect Ratio.
When the Crop Image window load, the crop rectangle, which is marked by the red corners, is preset to 16×9 aspect ratio (Landscape). You can resize the 16×9 window and move it round. If you want to crop a Portrait image in
9×16 aspect ratio, click on the Change Aspect Ratio button and choose Portrait. If you want to freely move the corners around the image regardless of the aspect ratio, select Free Form in the aspect ratio selector.
After you are done, select Crop And Save to save the current selection. Note that if you want to keep the whole image, simply don’t crop the image and save the slide image as stated in Step 3 above.
Now that you have created a slide, we have to add it to a playlist that is linked to a specific TV in order for the slide to be shown on that TV.
When you first create your account, we automatically create a new TV and a new playlist for you that is linked to that TV. Later on, we’ll show you how to create new playlists and link them to your TVs or change the playlist
of the TVs.
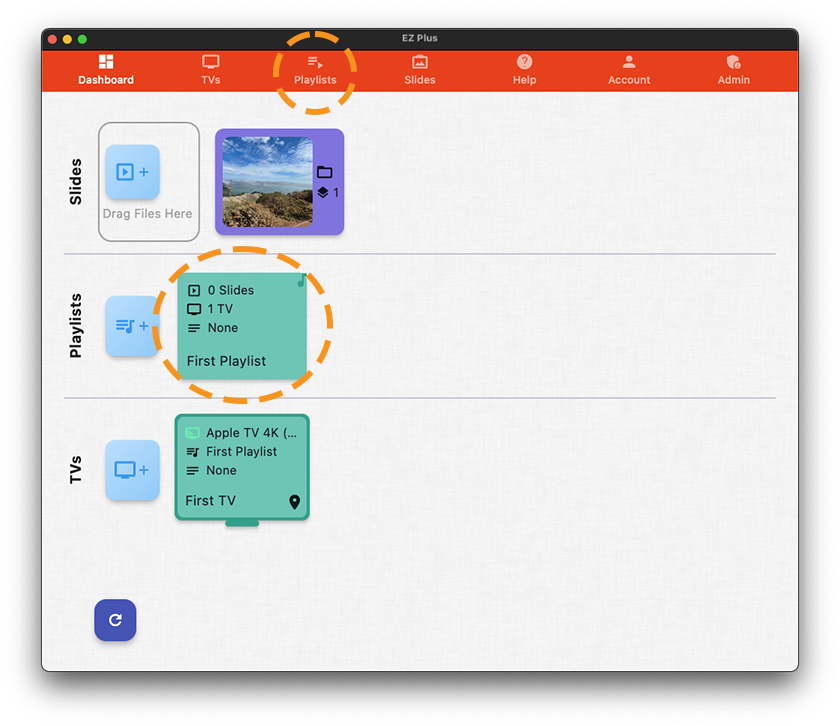
For now navigate to you dashboard, and click on the playlist you want to modify
a- Click on the playlist you want to modify on your dashboard or the Playlists page
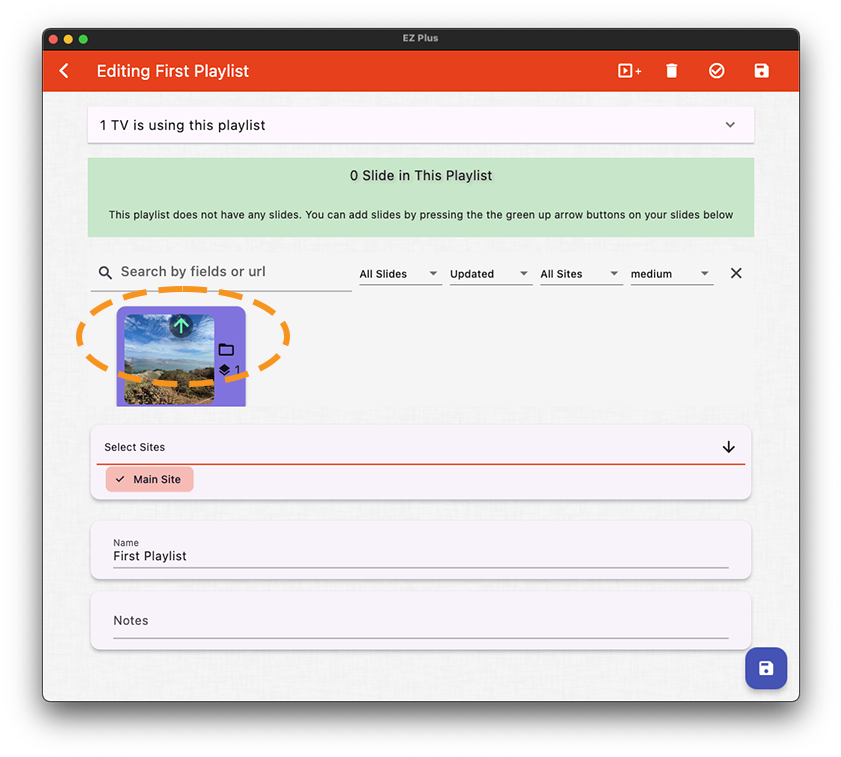
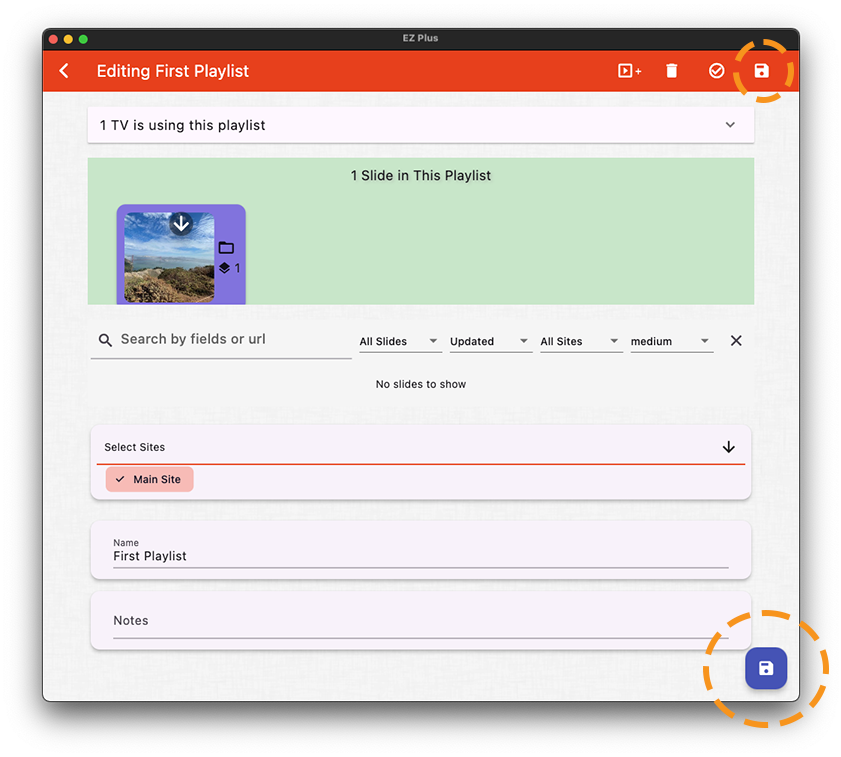
b- hit the green up-arrow on your slide in the middle of the screen to move the slide to the playlist slides
c- Click on the Save & Exit button to finish modifying the playlist and go back to the dashboard
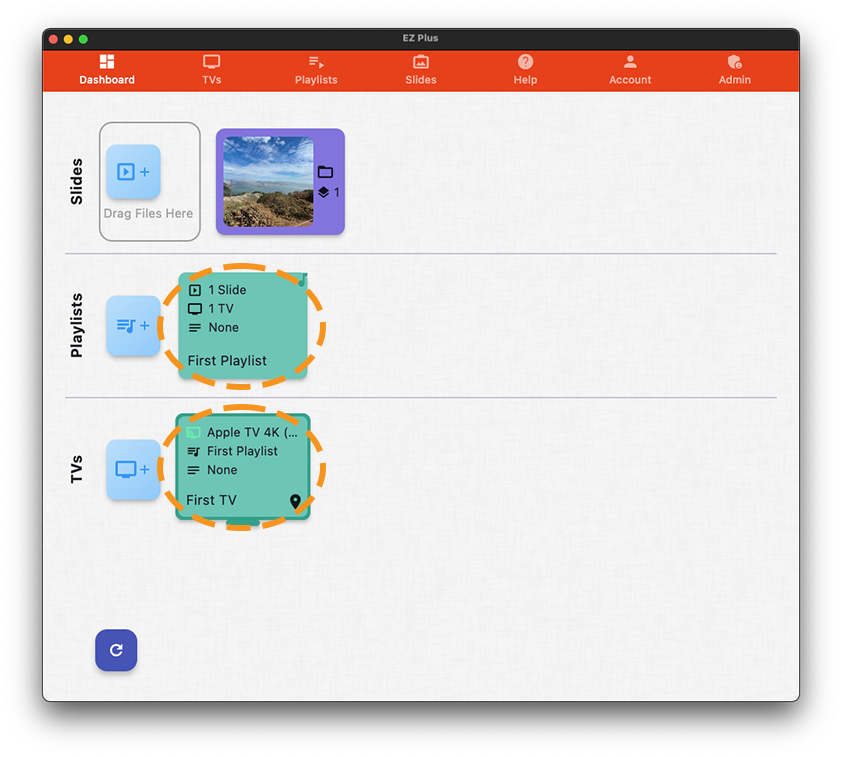
d- Note how your playlist now has 1 slide in it and also how your TV is showing the “First Playlist” as the playlist it’s playing
Let’s look into what settings are available in EZ+ for configuring your TVs. The settings for the TVs are accessible when editing single TVs and when editing TV-Groups. Let’s first look at configuring an individual TV and then we’ll have a brief review of configuring multiple TVs at one.
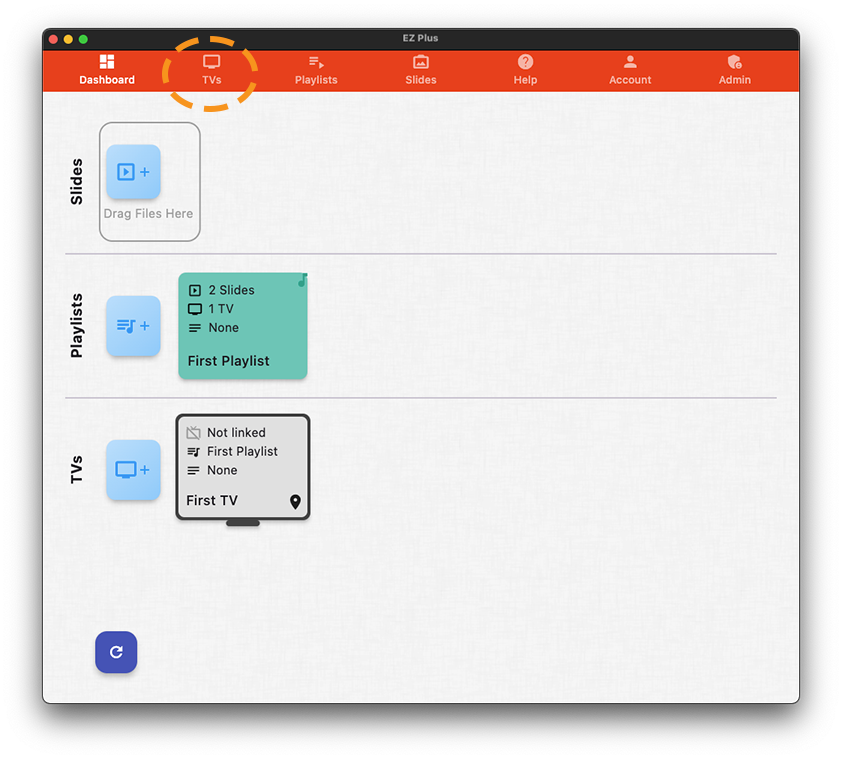
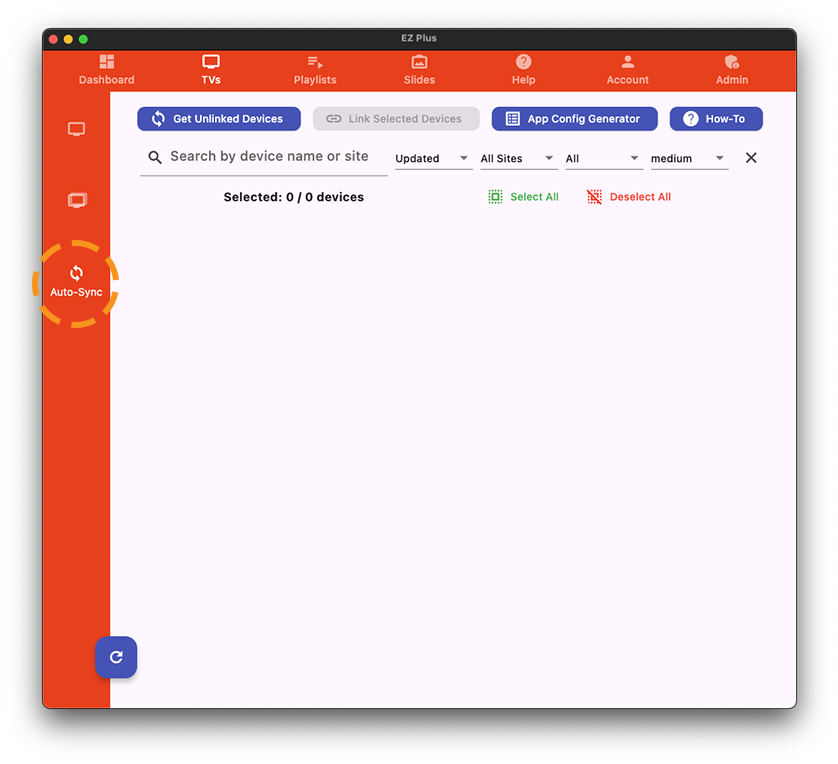
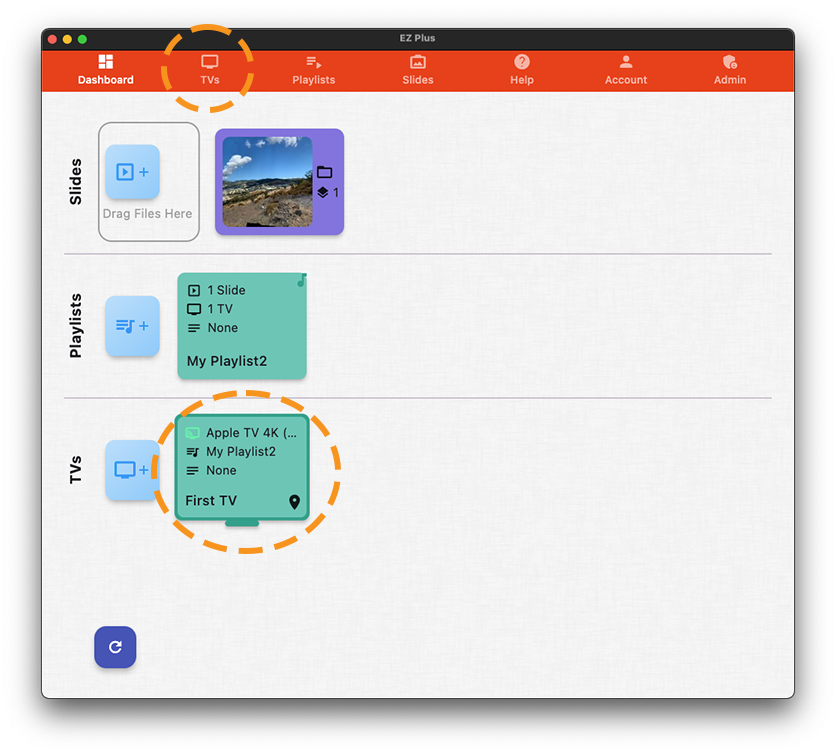
1- Navigate to the TV’s tab of your EZ+ management application where you can access the TVs or the TV-Groups through the vertical tab on the left of the screen. Note that you can also directly access your TVs in the Dashboard tab.
1.a- You can click on the TVs tab on the top or directly on the TV you want to edit in the Dashboard
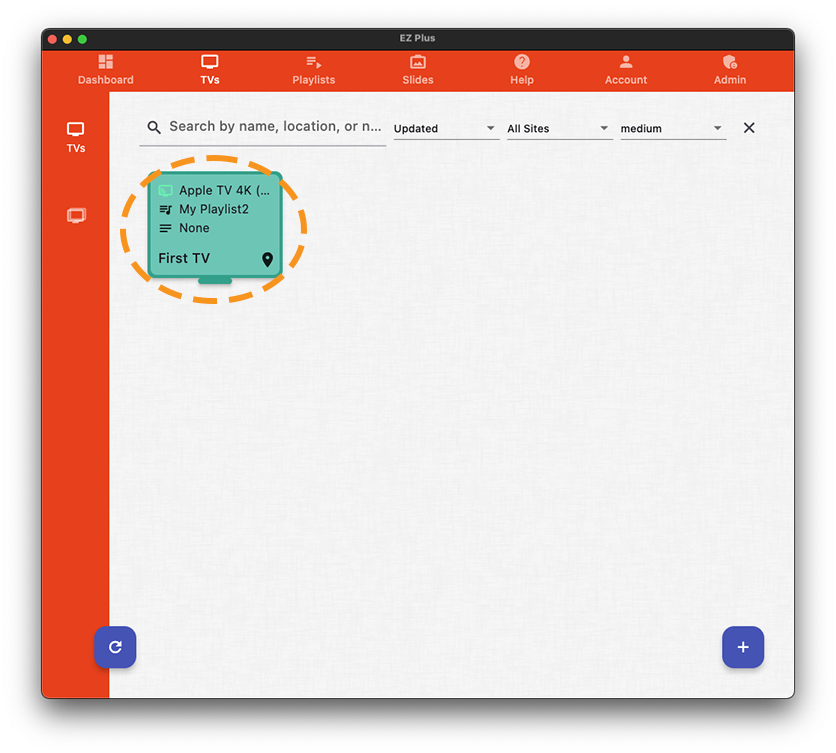
1.b- All your TVs are accessible in the TVs tab where you can search and filter
2- After clicking on a TV you will be taken to the TV-form where you can modify and adjust the settings of that TV. At the top of the page, we have the “Linked Device” section which we already covered when setting up your TV. Below it there is “Content & Setup”, which we will focus on in this section. After Content & Setup, there is the site-assignment card, followed by the Name card, and finally the Notes card where you can keep notes about this TV.
“Content & Setup” has two main parts, one is the “quick actions” section and then there is advanced configuration accessible by clicking on the gear icon on the top right hand side of the card
2-a. TV-form where you can modify the settings of the TV through Quick Actions of Advanced Configuration
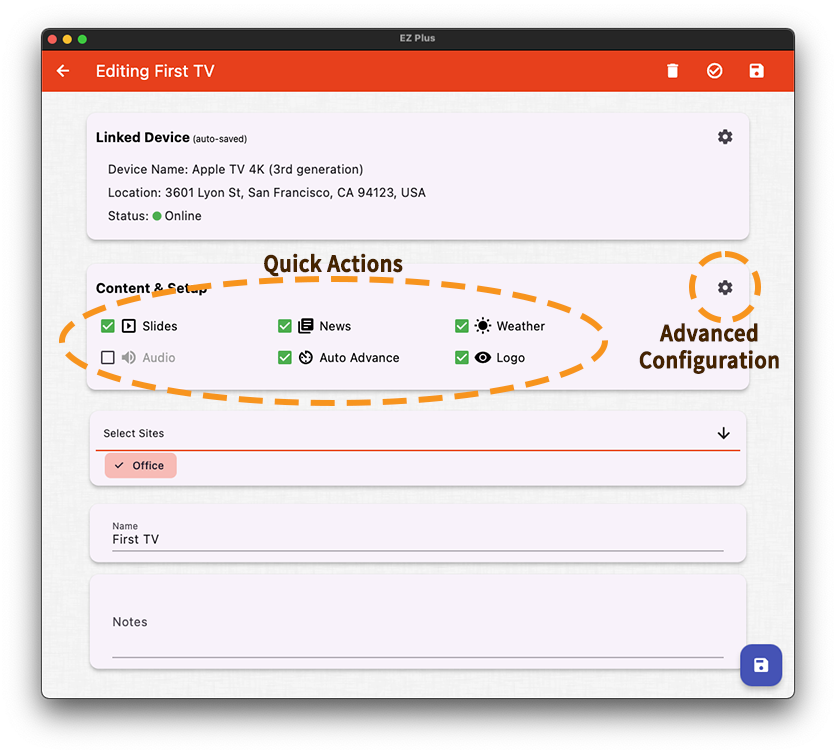
3- Let’s focus on the Quick Actions for now. Quick actions are shortcuts for modify some of the common TV settings including:
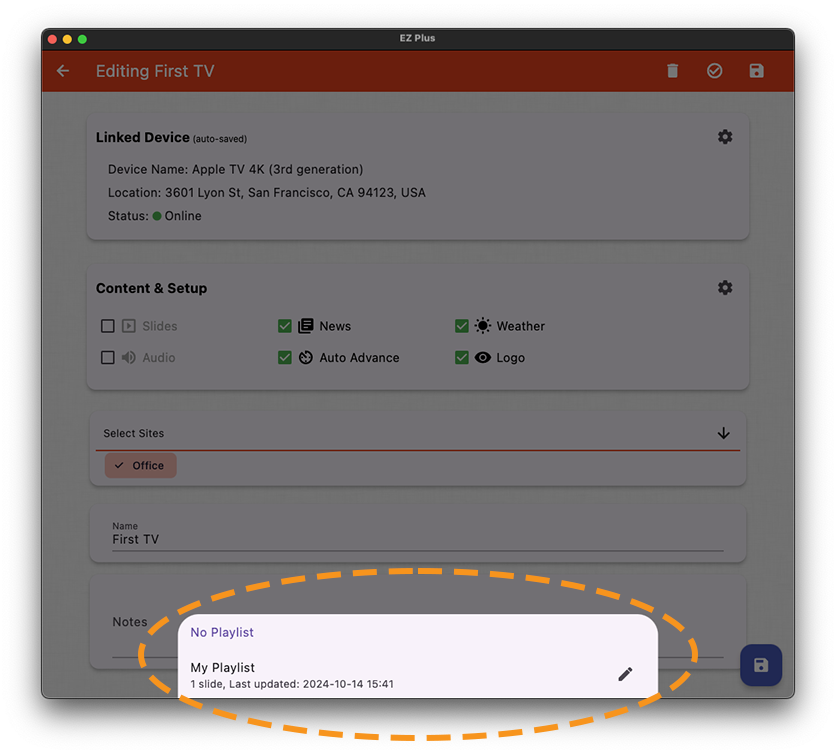
- “Slides”: select whether to display your own slides on this TV or not, and if yes, which playlist to play on the TV
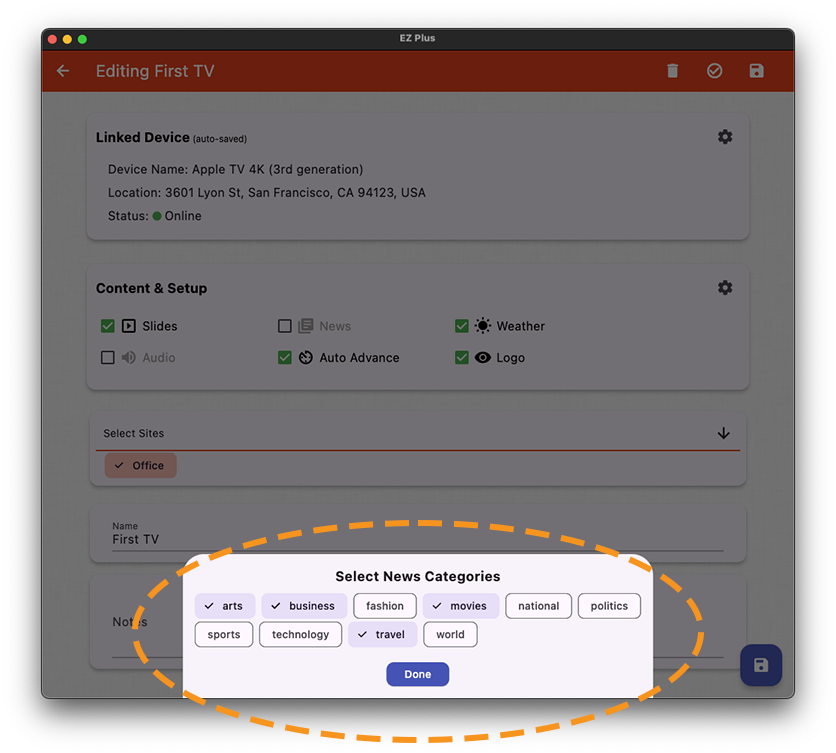
- “News”: select whether to display our curated news items on this TV or not, and if yes, which categories of news to show (defaults to 100 news items)
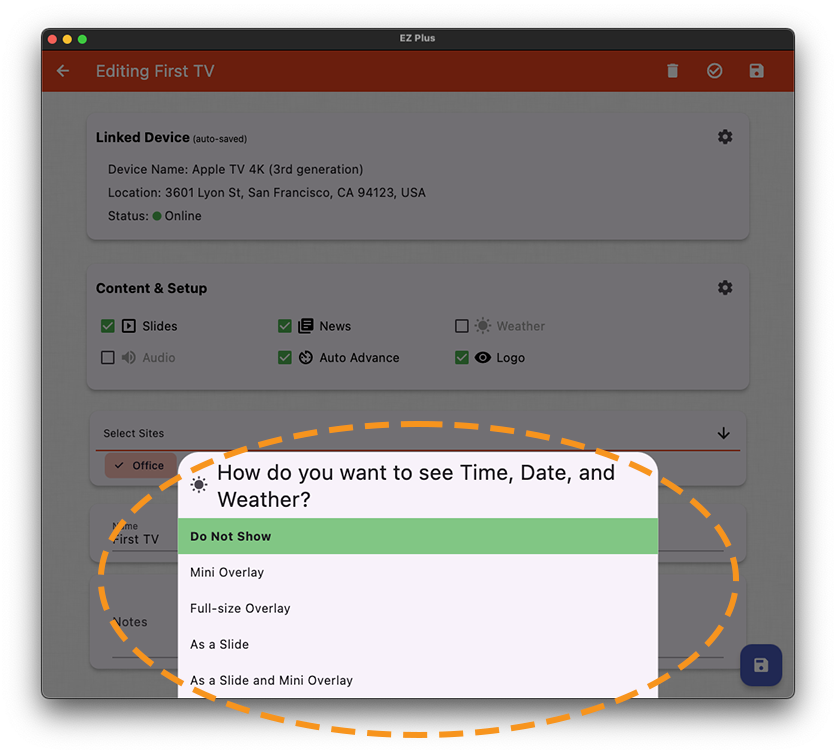
- “Weather”: select whether to display Time/Weather on this TV or not, and if yes, what layout and configuration for doing so
- “Auto Advance”: whether to automatically advance the pages on the TV or not, and if yes, at what paste
- “Audio”: whether to mute the EZ+ audio on this TV or not, which currently implies whether to mute your Video slides or not
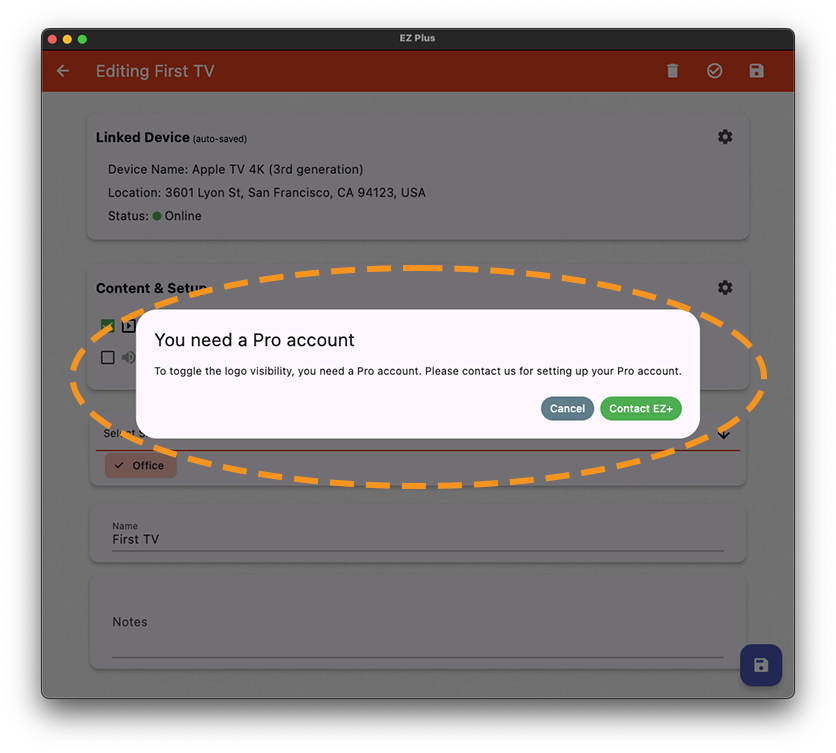
- “Logo”: whether to display the EZ+ logo on this TV or not, which translates to whether you want to use one of your Pro TV tokens on this device or not. If you do not have a Pro account, this action item will let you contact us in inquire about it.
3. Slides: Choose “No Playlist” to turn off the slides. You can also modify your playlists from this dialog
3. News: You can choose which news categories to show on this TV
3- Weather: choose how to display the weather/time widget on this TV
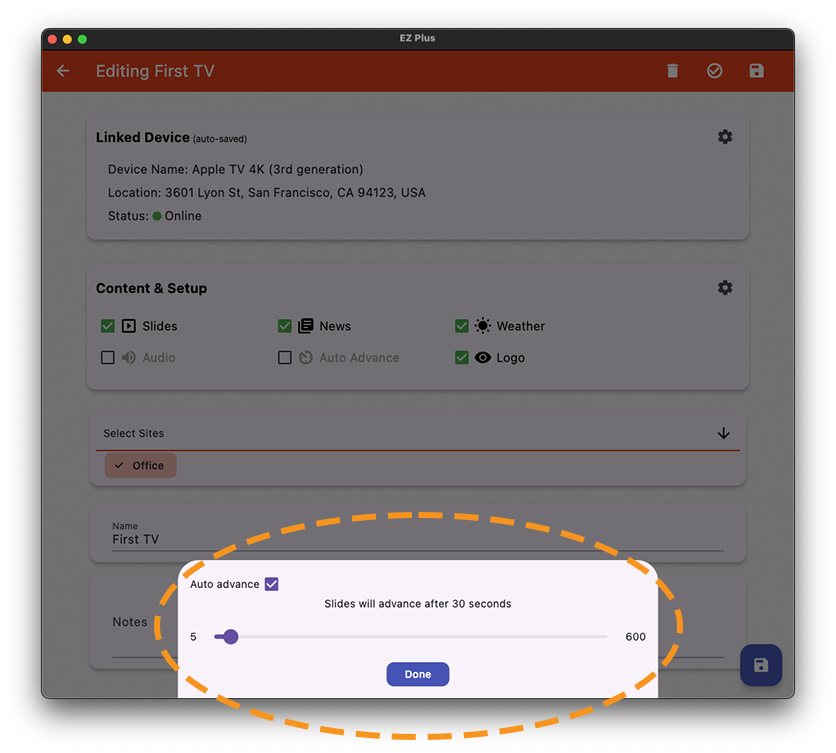
3- Auto Advance: You can turn off auto-advance or choose the paste of the slides
3- EZ+ logo visibility: You need a Pro account to hide our logo on your TV. Contact us to learn more.
4- Let’s look the advanced configuration options and see what can be controlled here. After clicking on the gear icon on top right corner of “Content & Setup” you will see the following groups of configurations:
- “Slides” group: has two card letting you control the playlist and also how your slides are mixed with the news items.
- “Playlist”: This is similar the quick action for the Slides that we covered before. Here you can turn off showing any slides on this tv by selecting “No Playlist”, or pick the playlift you want to be played on this TV.
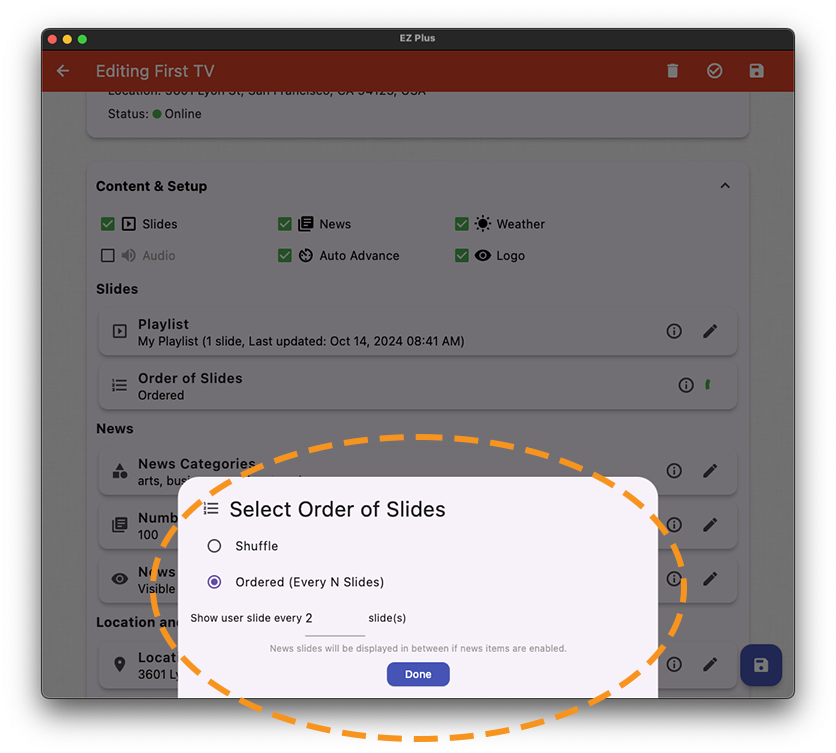
- “Order of Slides”: Here you get to choose to whether shuffle the news and your slides, or have them displayed in-order. When the slides/news are displayed in-order, the “N” number controls how often you see your slides, with
a higher N meaning that your slides will be shown in longer intervals. For example, every 2 slides means your slides are shown every other page, and every 4 slides means that there are three news items between your slides
4- Order of Slides: you can select between shuffling & ordering the news items and your slides in various ways
- “News” group
- “News Categories”: This is similar to the News quick action item where you get to pick the news categories you are interested in.
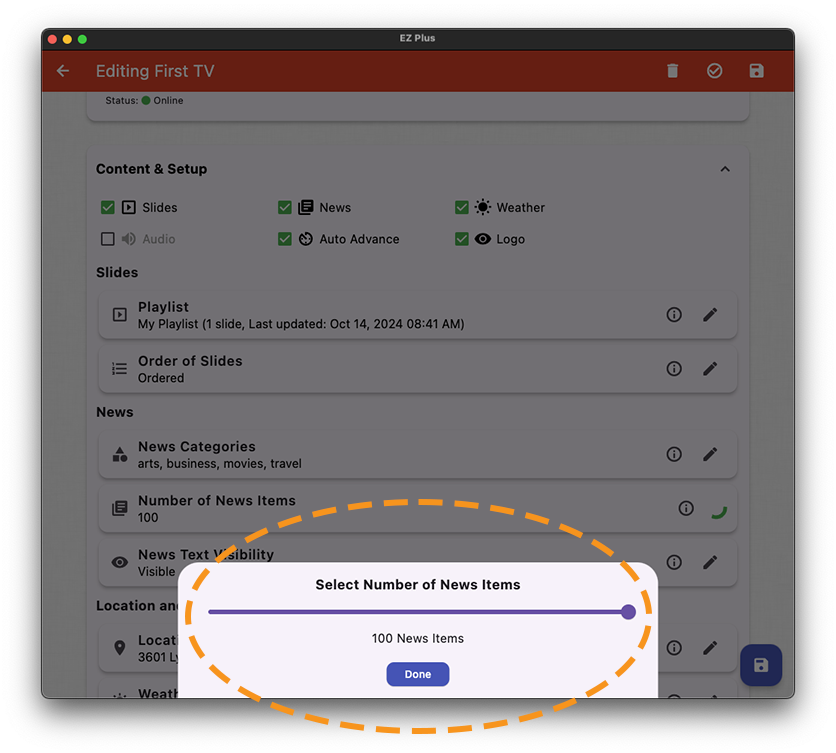
- “Number of News Items”: This controls how many news items are shown on your TV and can be a number between 0 and 100. If you set this number to 0, no news items will be displayed on the TV. Also, when you toggle on the News quick action checkbox, we automatically set this number to 100 for you.
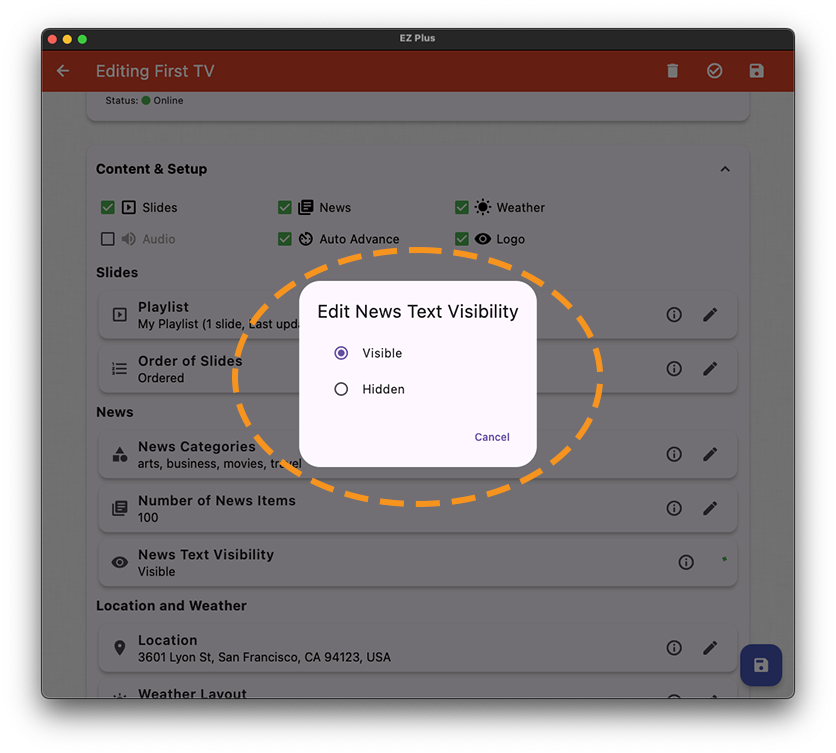
- “News Text Visibility”: If you don’t want to see the title/summary of the news slides, you can set this to hidden. This creates a visually appealing and contextually relevant slides of images around the current news of the day
4-Number of New Items: Let’s you control how many news items are displayed on your TV
4- News Text Visibility: Let’s you control the visibility of the title/summary text in the news slides
- “Location and Weather” group
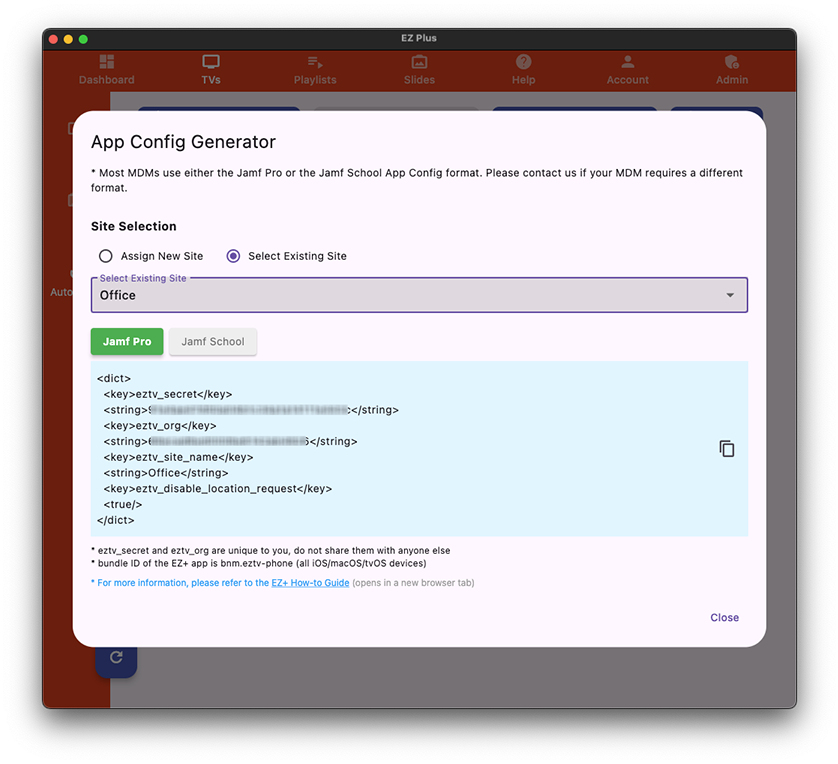
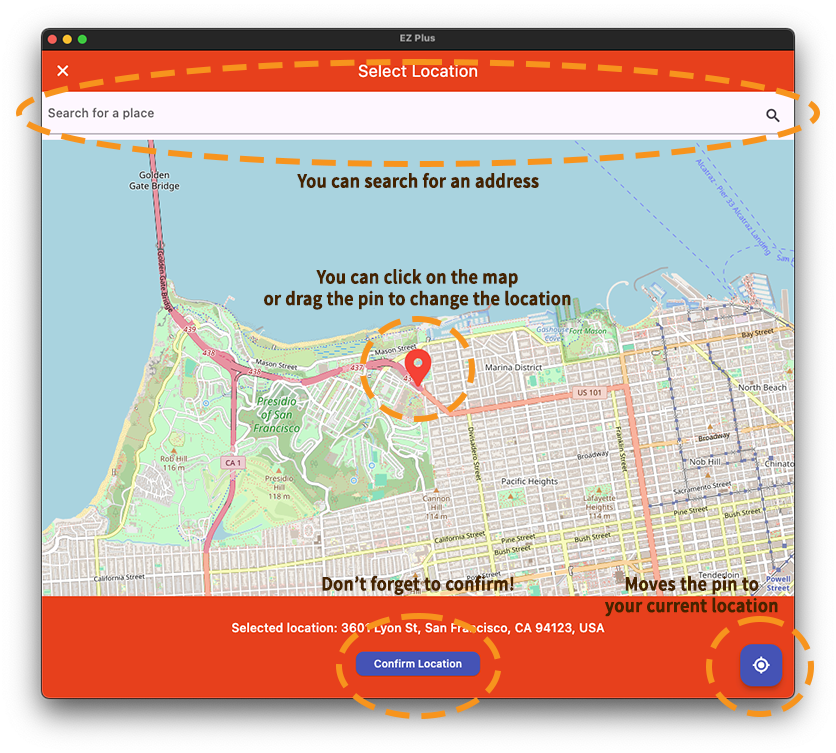
- “Location”: when location services are enabled on your Apple TV device that is linked to this TV, the location will show the approximate location of your device. You can set or overwrite the location of your device to get the correct date/time/weather-forecast at your TV. When you have not granted permission to EZ+ on your Apple TV to use the location service, or when you choose to disable our automatic location lookups through MDM profiles, you can use this configuration to set the location of your TV. Don’t forget to “confirm” the location you pick to apply your changes.
- “Weather Layout”: This is similar to the Weather quick action checkbox where you get to set how you want time/weather to be displayed on your TVs.
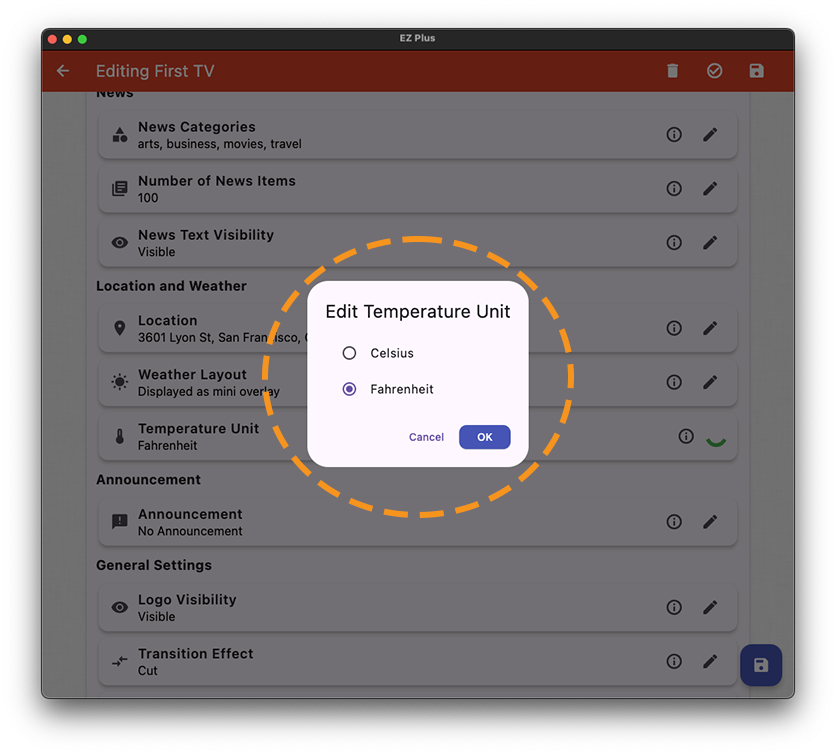
- “Temperature Unit”: choose between Celsius and Fahrenheit to suit your needs.
4- Location: you can set the location of your TV for accurate time/date/weather-forecast
4- Temperature Unit: choose between Celsius and Fahrenheit
- “Announcement” group
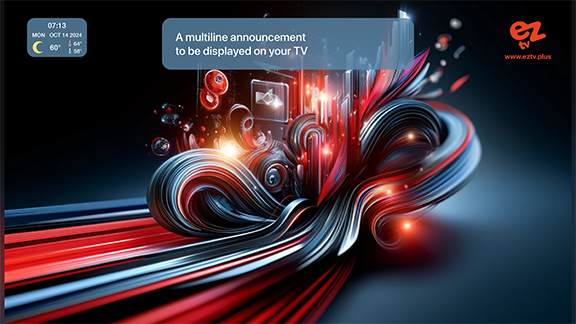
- “Announcement”: You can enter a multi-line announcement that will be permanently displayed on this TV. This could be your Wi-Fi username/password. Delete the text to disable this feature.
4- Announcement: This multi-line text will be permanently displayed on the TV
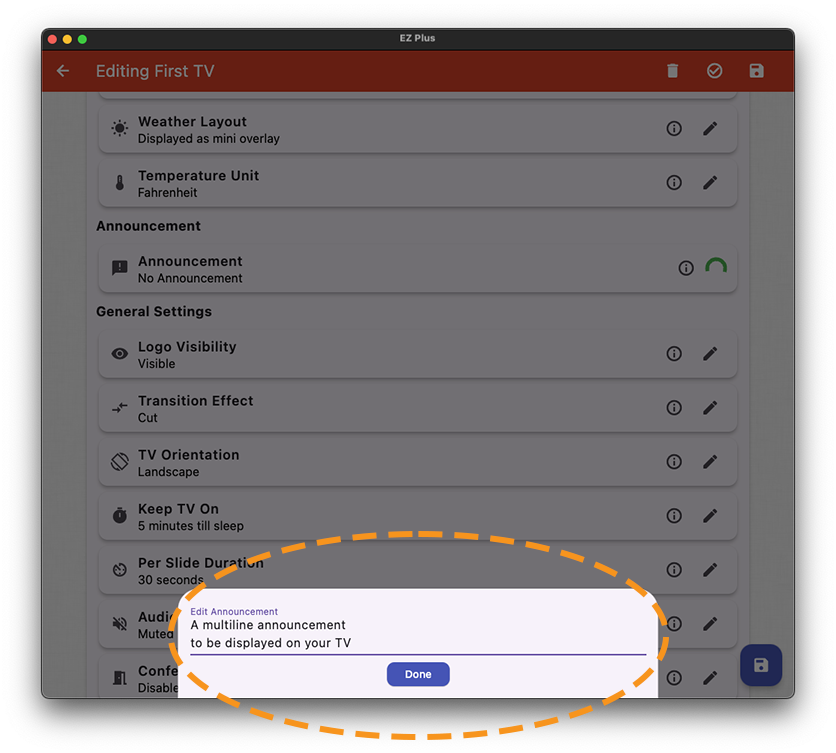
4- Announcement: An example of how announcements will look on your TV
- “General Settings” group
- “Logo Visibility”: This is the same the Logo quick action checkbox. If you don’t have a Pro account, it will prompt you to contact us through email.
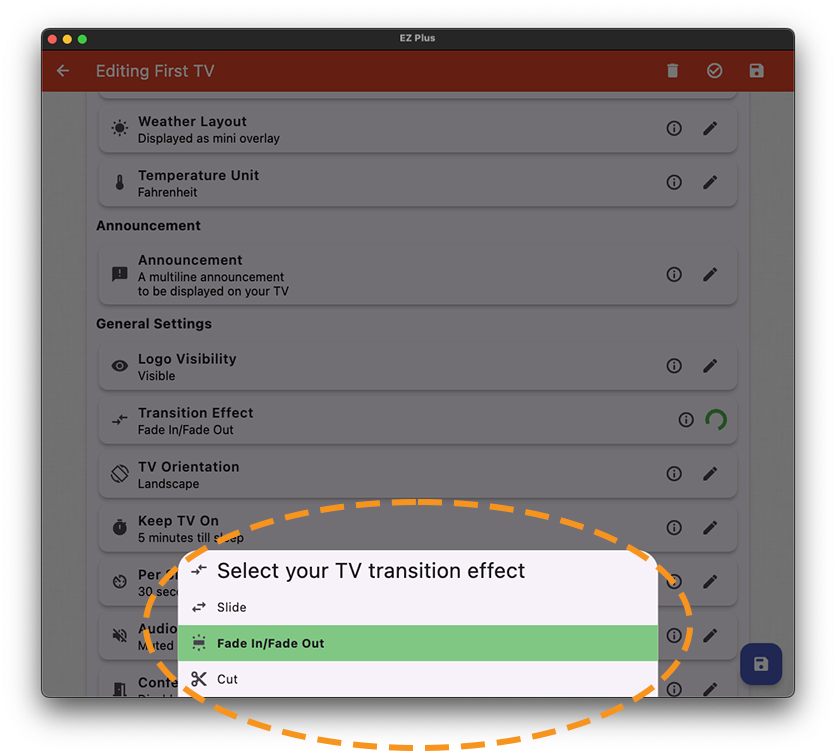
- “Transition Effect”: This controls the transition effect between the slides when auto-advance is enabled. You can choose between the legacy “Slide” and our new “Fade in/out” and “Cut” transitions.
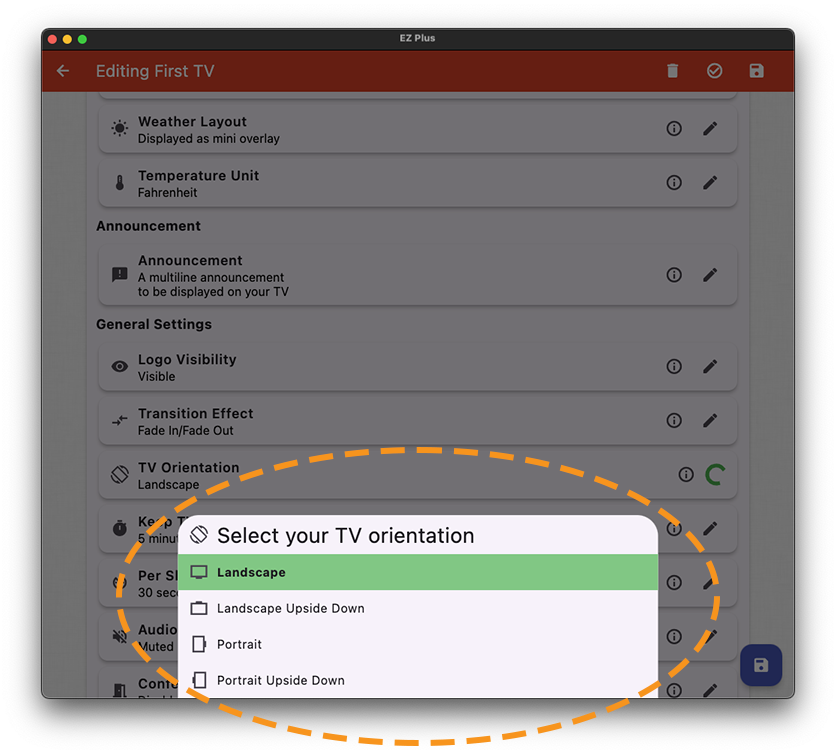
- “TV Orientation”: This let’s you set the orientation of your TV. Note that Apple TV itself doesn’t support non-landscape orientations, so when you change the orientation here, if you are using the Apple TV’s remote to navigate the controls, you have to also rotate your Siri remote according to your TV orientation for the directional navigation to work fine. Doing so is not very intuitive but it will get the work done. Hopefully you don’t have to use the Siri remote much with our App in non-landscape orientation; and if you do so, you’ll get it once you practice a little. We have done our best to make this experience as smooth as possible.
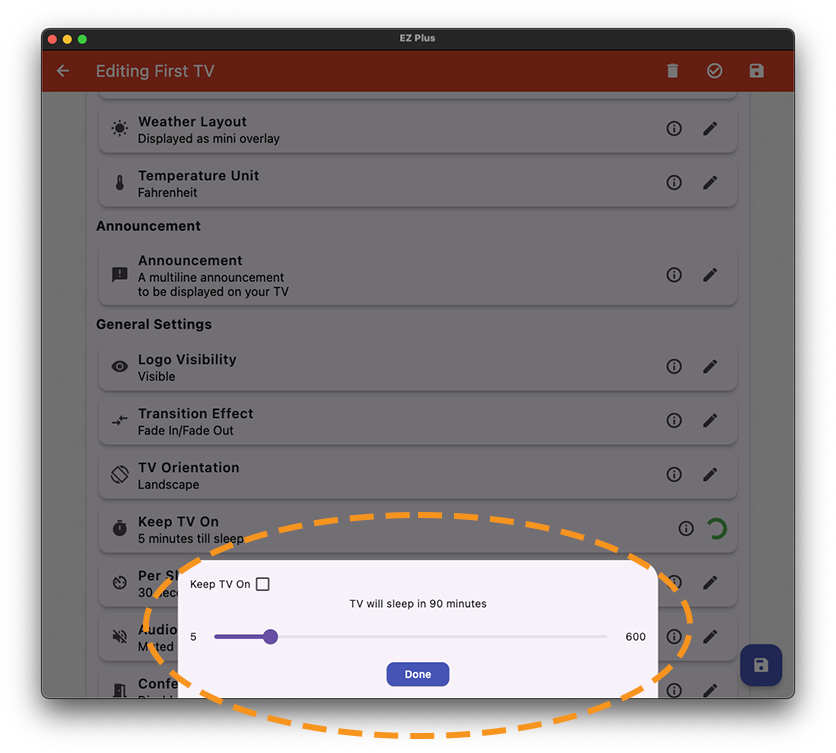
- “Keep TV On”: This allows you choose whether to keep the TV on (disable the built-in Apple screensaver) when EZ+ is running or allow the Apple TV to switch to the built-in screen saver after a certain amount of time. You should always select “Keep TV on” if you are using EZ+ as a digital signage and/or a supercharged screensaver!
- “Per Slide Duration”: You can control the duration of the slides shown on this TV with this configuration card. Note that if you set the Duration of any slides in a Slide form to something other than Default, that duration will overwrite the TV-wide slide duration configuration set here.
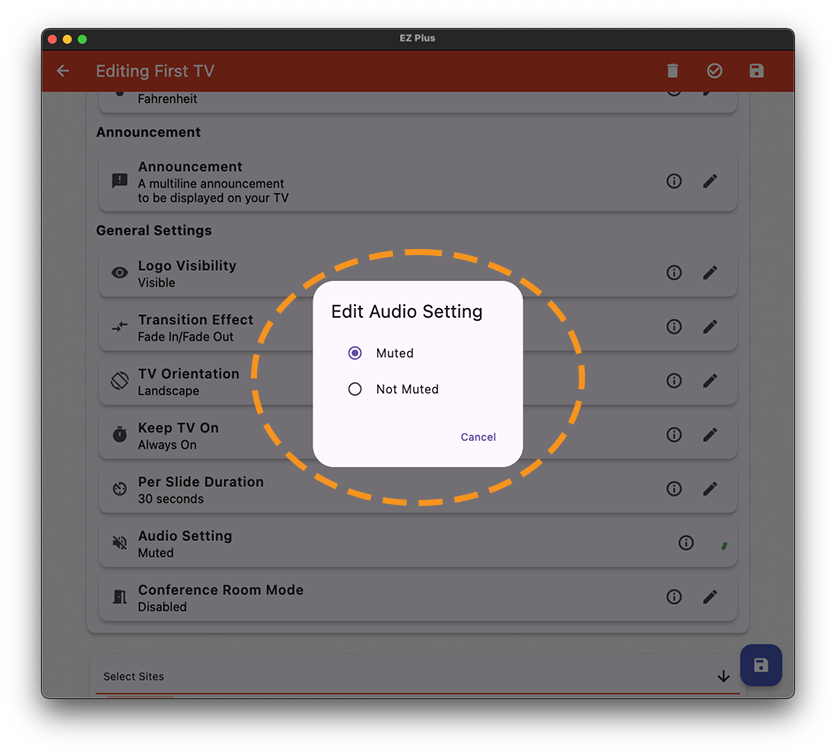
- “Audio Setting”: This is similar to the quick action Audio checkbox where you get to mute/unmute EZ+ on your Apple TV.
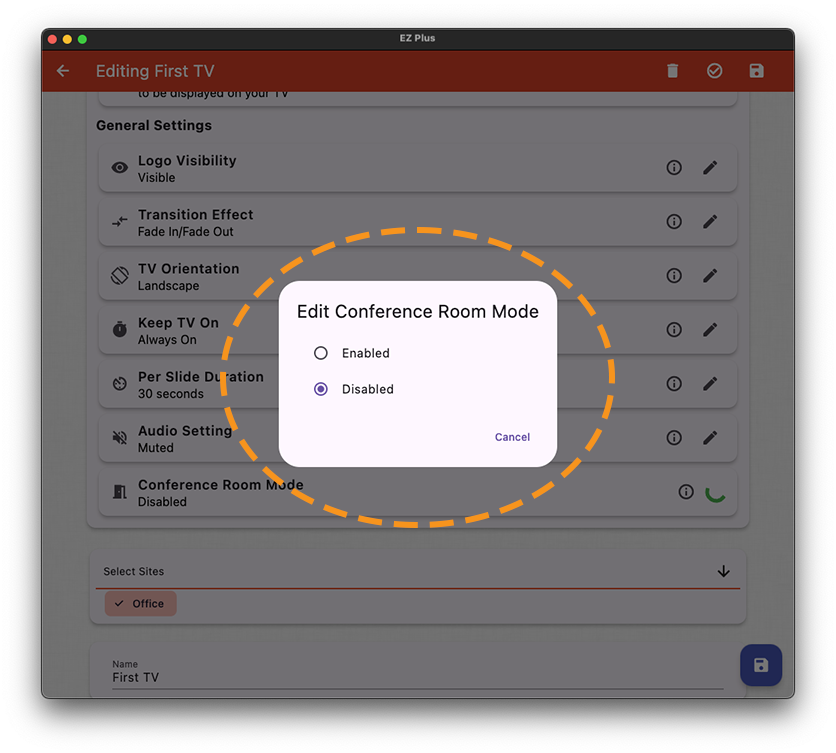
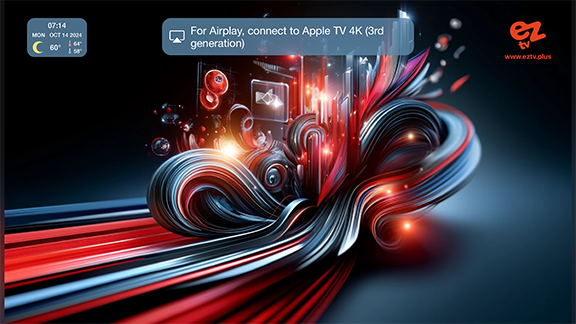
- “Conference Room Mode”: When enabled, this will show a permanent message on top of your TVs with the name of the Apple TV box to help with airplay devices connecting to the TV. Note that the name of the Apple TV device set in the Apple TV itself will be shown on the message and not the name of the TV you have picked in the TV-form.
4- Transition Effect: You can control the slide transition effect when slides are set to auto-advance
4- TV Orientation: You can choose between 4 major orientations for your TV
4- Keep TV On: You can disable the built-in Apple TV screensaver to keep the TV on while EZ+ is playing
4- Audio Setting: you can mute/unmute EZ+ on your Apple TV
4- Conference Room Mode: display the device name of your Apple TV on EZ+ to help with airplay connections
4- Conference Room Mode: This is how EZ+ will look with Conference Room Mode enabled
Let’s now explore the Alert Feature and see how you can setup Automatically triggered alerts or trigger an alert manually.
First we will cover the manual triggering of alerts. You can trigger a manual alert either from the dashboard or the new Alert Management page in the Admin tab of the dashboard.
1- Navigate to the Dashboard tab of the management application and click on the red button at the lower right hand side of the screen which will take you to the Manual Alerts page
1.a- Click on the Manual Alerts button on the lower right hand side of your dashbaord
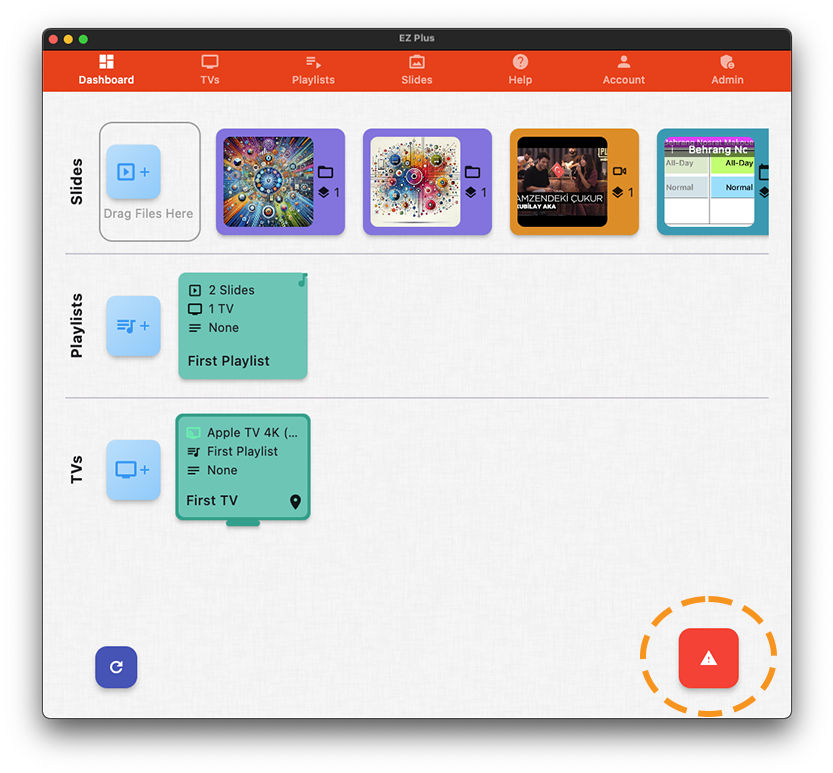
1.b- In the Manual Alerts page you can choose between preset Alerts or create a custom one
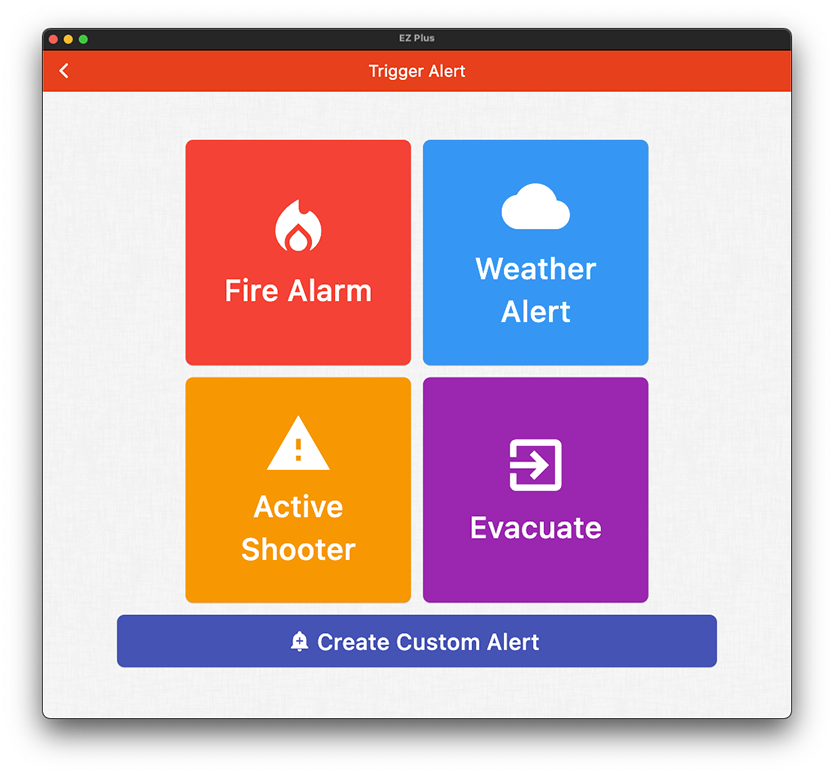
2- As an example, let’s trigger a Fire Alarm by selecting the Fire Alarm button. When you select a preset alert, a dialog box will ask you to confirm the alert and allows you to change the Target Audience of the alert. The
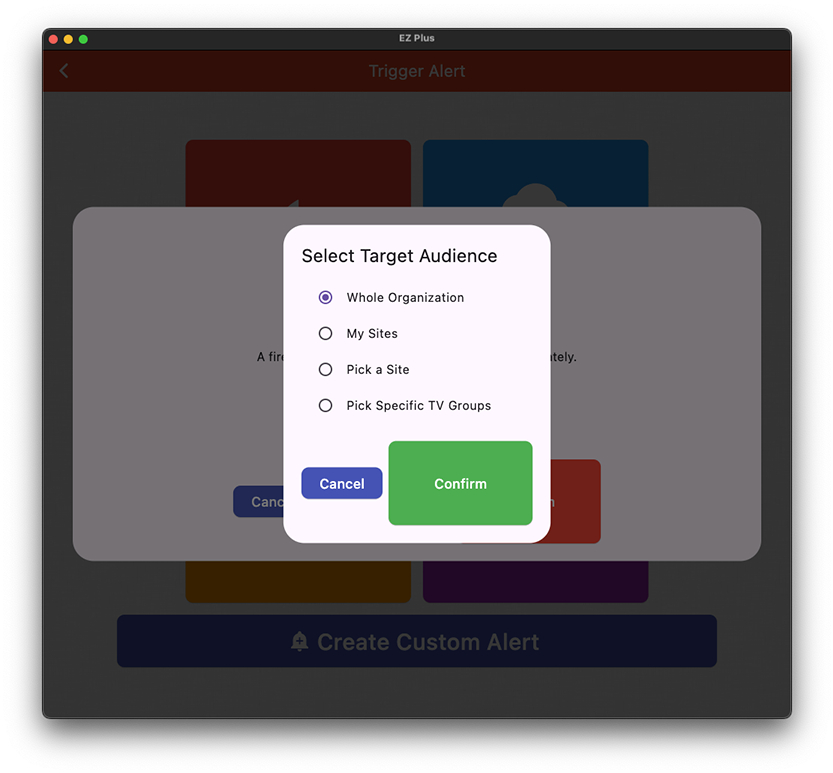
Target Audience controls which TVs will be showing the triggered alarm. The options for the target audience are the “Whole Organization”, “My Sites”, “Pick a Site”, and “Pick Specific TV Groups”.
The “Whole Organization” option will display the alert on all the TVs in your organization, and is the default option. The “My Sites” option will display the alert on the TVs that are part of the Sites that you are a member
of. The “Pick a Site” will let you pick site between the Sites that you have access to. And finally, “Pick a Specific TV Group” will let you pick among TV Groups that has been created by users.
2.a You can choose which TVs to display a preset alert in the confirmation page
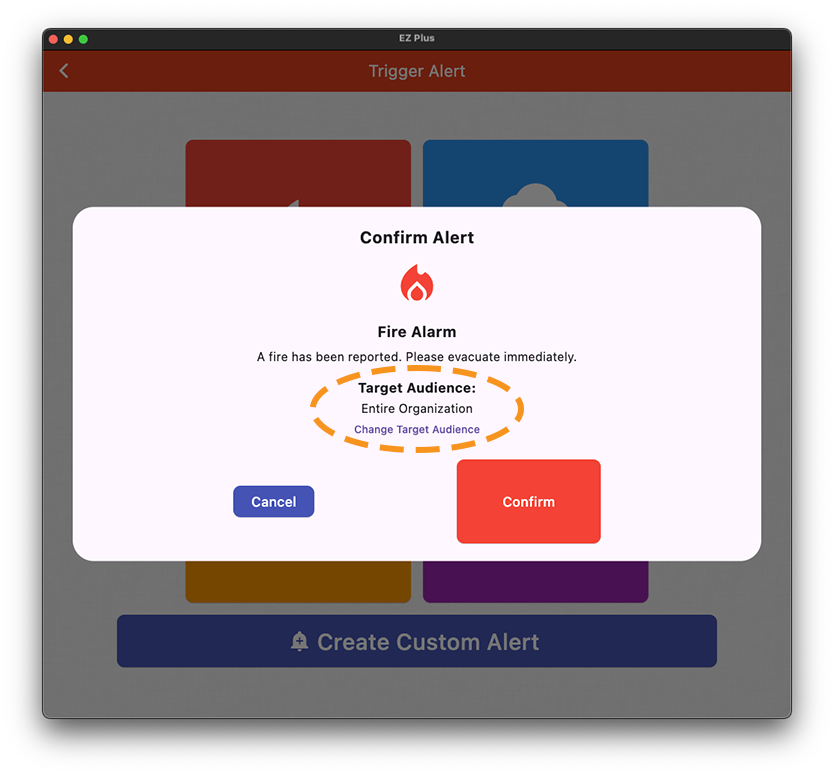
2.b You can change the target audience of preset alerts from the confirmation dialog
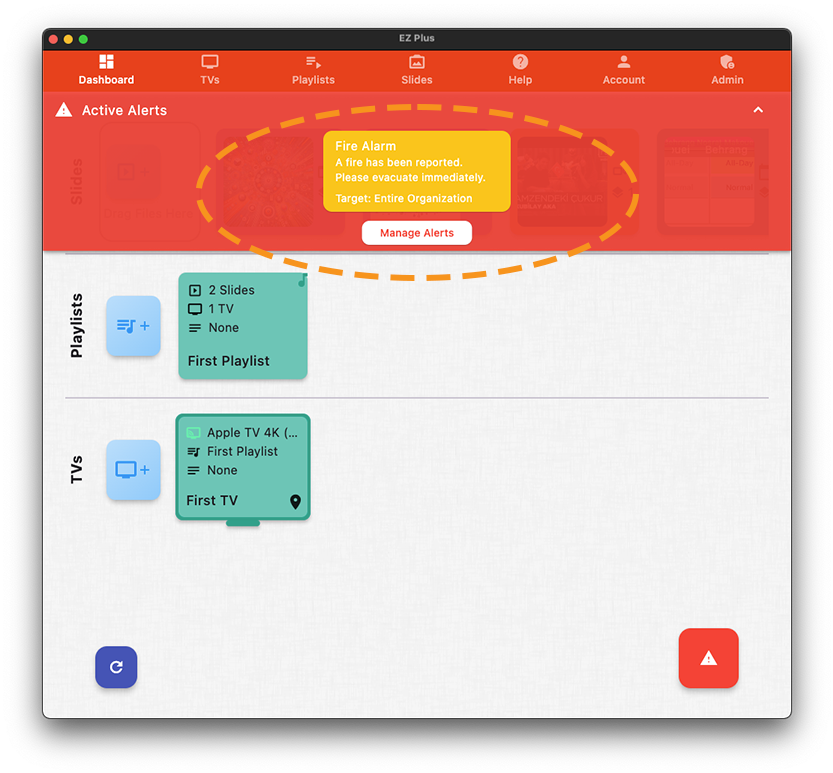
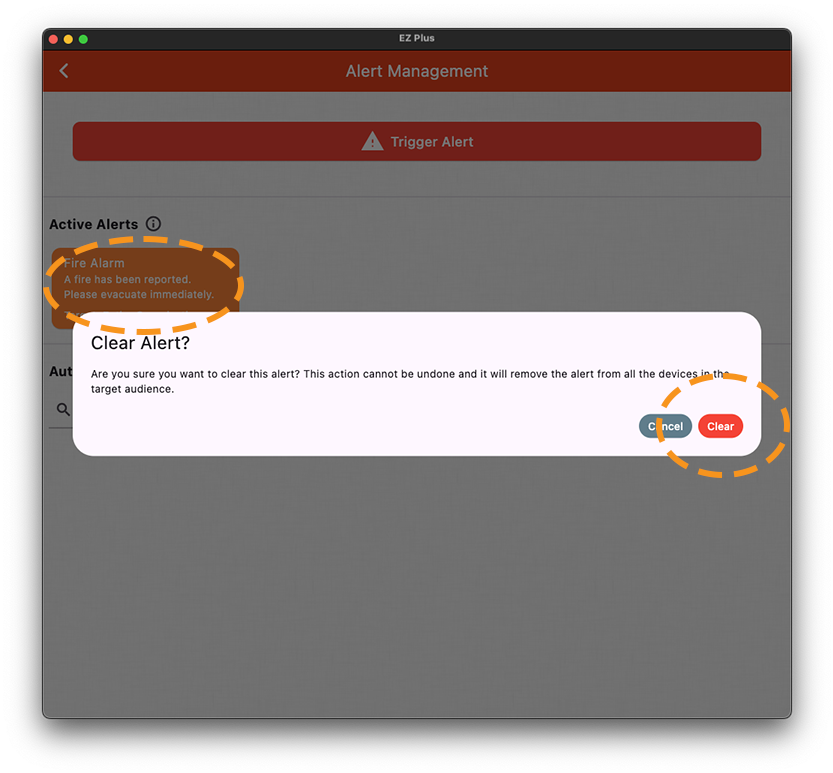
3- When an alert is triggered, you will see an alert notification in your management app, as shown in 3.a, and if you click on the “Manage Alerts” button, you will be taken to the Alert Management page. In the Alert Management
page, if you have the permission to clear the alert, you can choose to clear it by clicking on the alert and confirming the action. Note that the preset alerts will stay active until you manually clear them. As you will see
later on, for manually configured alerts, or for automatically triggered alerts, you can choose to display an alert for a specific amount of time which will not require manual clearing.
Also, if you don’t get a notification on your management app in case of an active alert, you can press the reload button on bottom left hand side of the dashboard to reload all the data, which will also fetch any existing
active alerts.
3.a You will see a notification on your management app when there are active alerts
3.b You can clear alerts in the Alert Management section
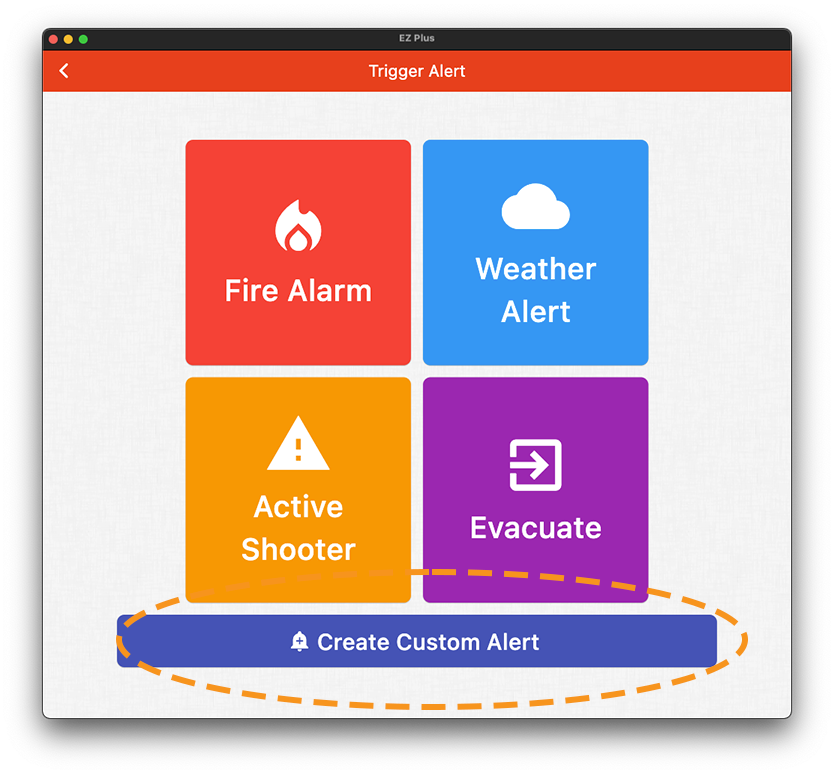
4- Now let’s look at creating a custom manual alert. Once you are in the Tigger Alert page, you can click on the “Create Custom Alert” button to broadcast a custom manual alert.
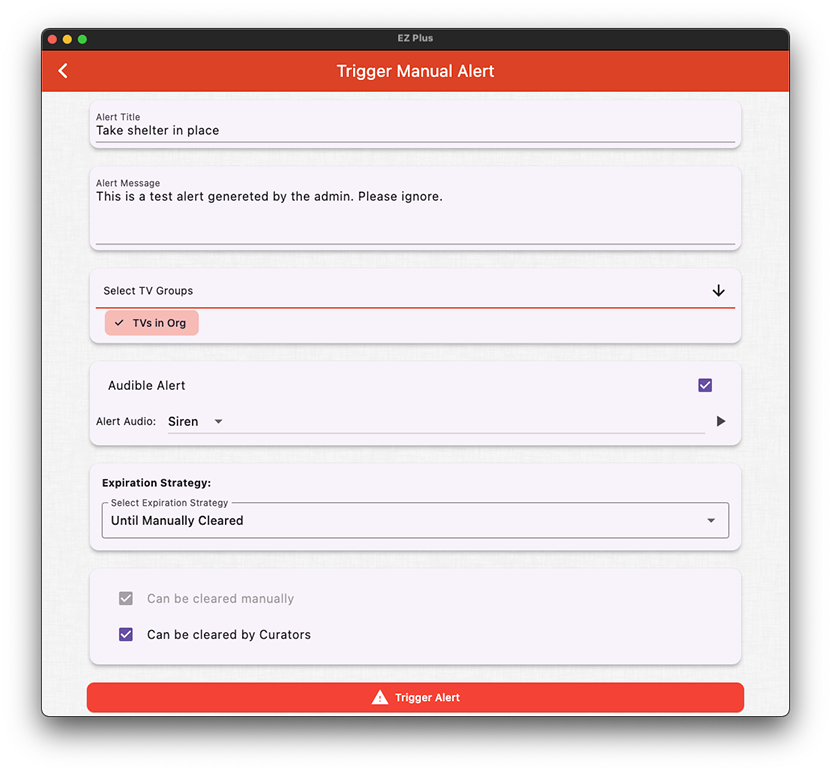
In the Tigger Manual Alert page, you can customize the text, the target audience, the audio, and the expiration strategy of the alert. You can also indicate whether the alert can be cleared manually and whether the Curators
have permission to clear this alert instance. Once you are done configuring the alert, press Trigger Alert at the bottom of the page to broadcast the alert.
4.a You can trigger a custom manual alert in the Trigger Alert page
4.b Configuring a custom alert for text, audio, duration, and the target audience
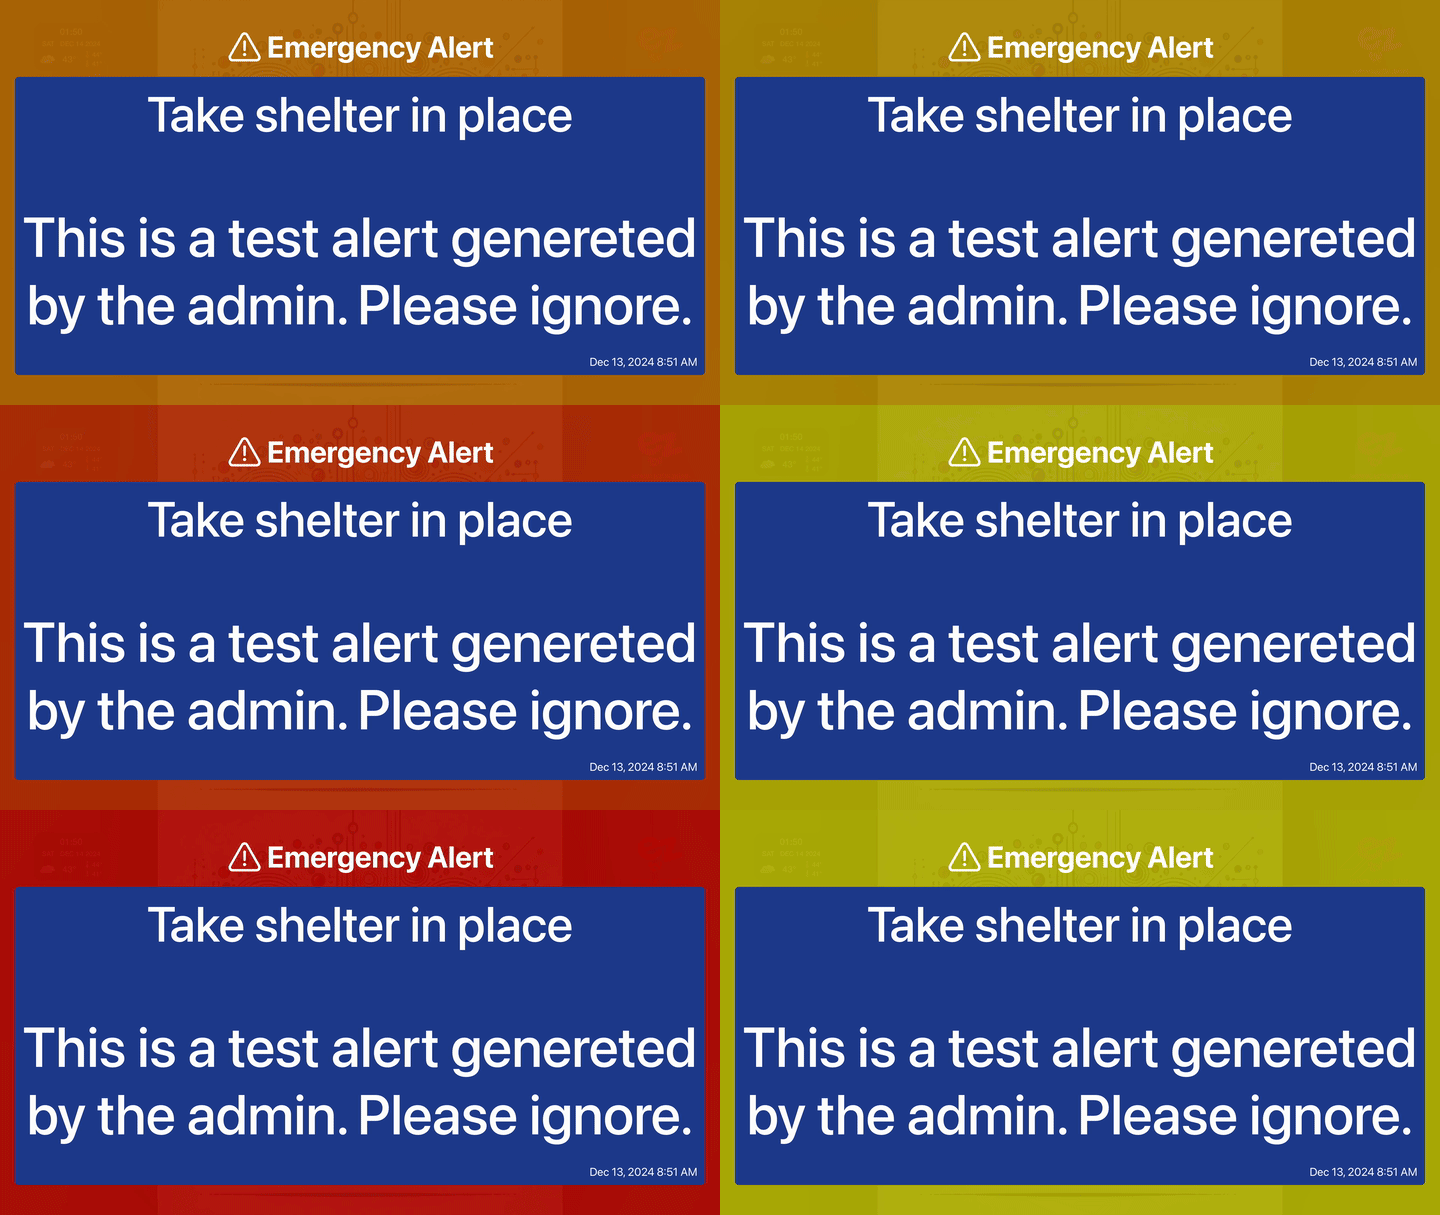
4-c An Example of how an alert is displayed on your TVs
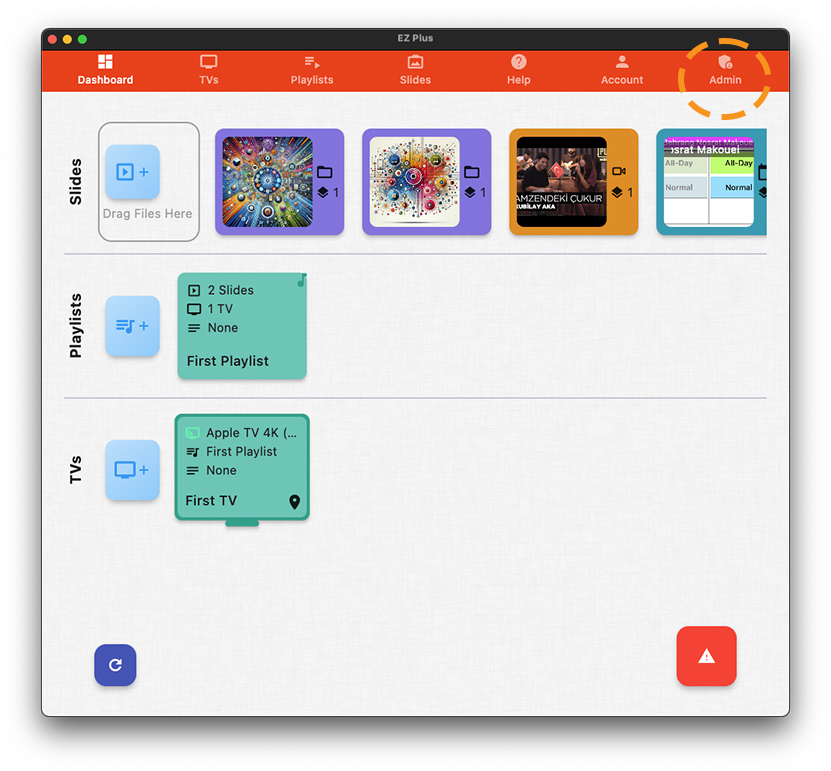
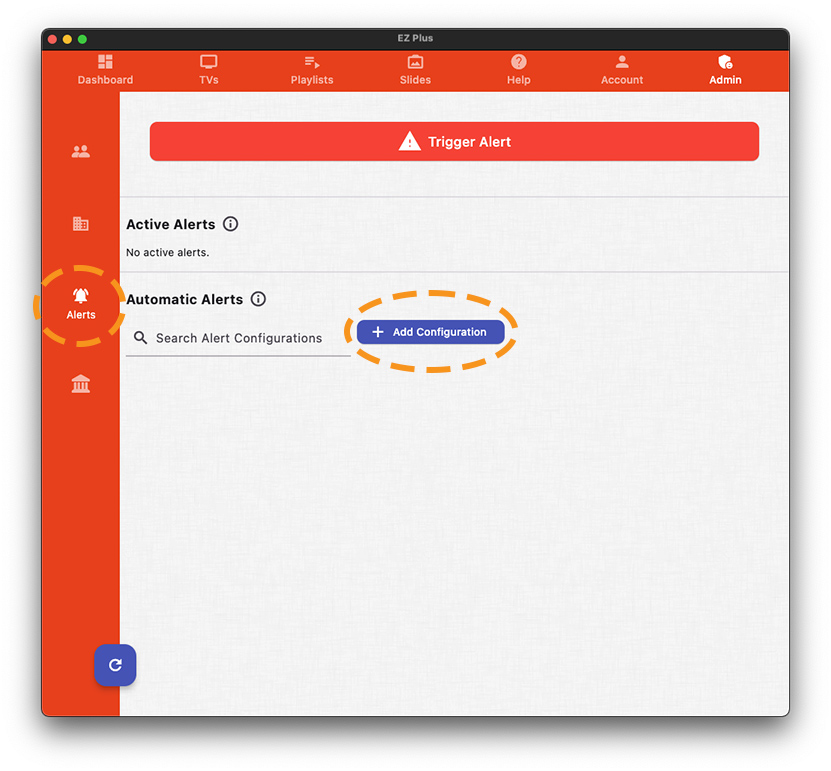
5- Now let’s look into creating automatically triggered alerts. First go to your Admin page, and then select the Alert Management page from the left navigation bar. This is where you can trigger a manual alert (in addition to the dashboard shortcut key), manage active alerts, and configure automatically triggered alerts. Let’s select “Add Configuration” from the Automatic Alerts section to set up our first automatically triggered alert.
5.1 Navigate to the Admin Tab to see the Alert Management page in the left navigation bar
5.2 In the Alert Management page, you can control manual and automatic alerts
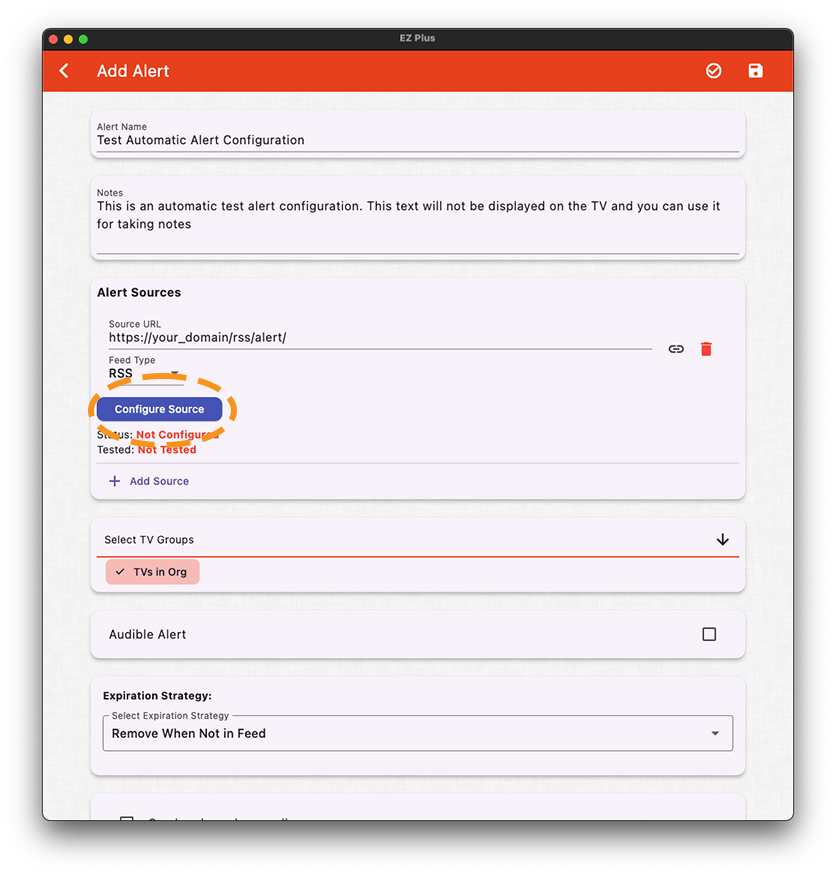
6- In the automatic alert configuration form, let’s give our alert configuration a name and write down some notes about it. Then we’ll put our RSS/ATOM feed url in the alert source URL under Alert Sources. Here you can add multiple sources for the same alert configuration. Note that to make sure our configuration is correct, we should test (and potentially configure) the logic for each source by clicking on the “Configure Source” button, which we will cover later on; we highly encourage you to make sure the configuration for your alert is correct in order to prevent getting false alerts or missing important ones. Like the manual alert configuration form, you can select the TV groups for which you want to assign this alert to, select whether you want the alert to be audible or not (and pick an alarm audio for it), choose the expiration strategy for the alert once it’s triggered, and also control if the alert can be cleared or not (and whether Curators can clear the alerts or not).
6.a In the automatic alert configuration form page you should test/configure each source
6.b Testing/Configuring an alert source requires a feed url or a sample XML from the feed
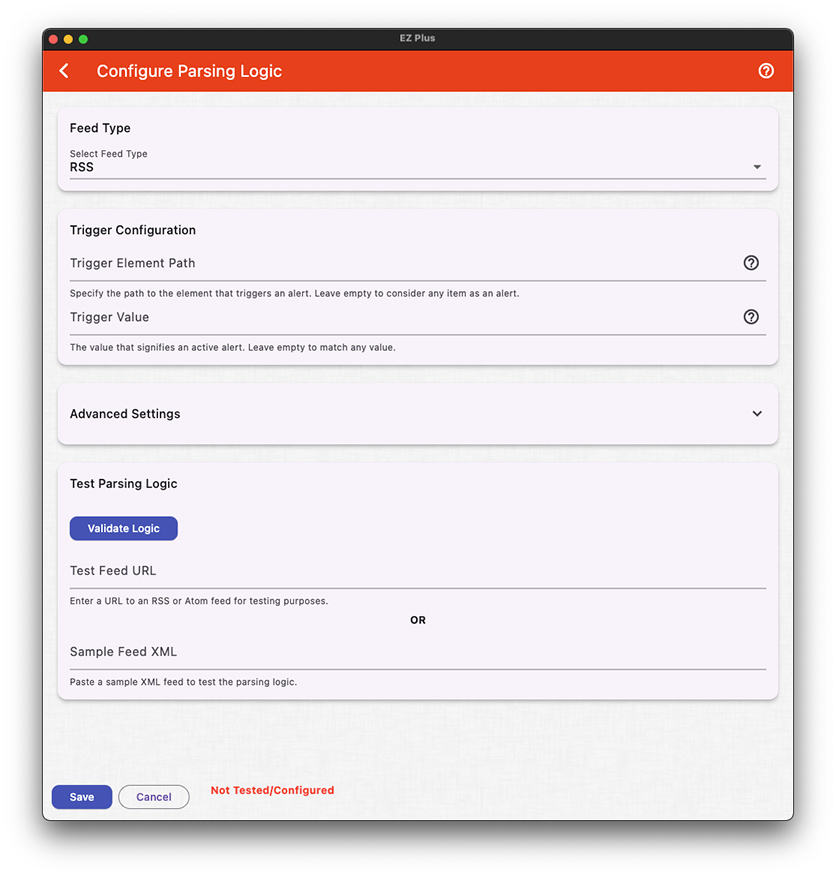
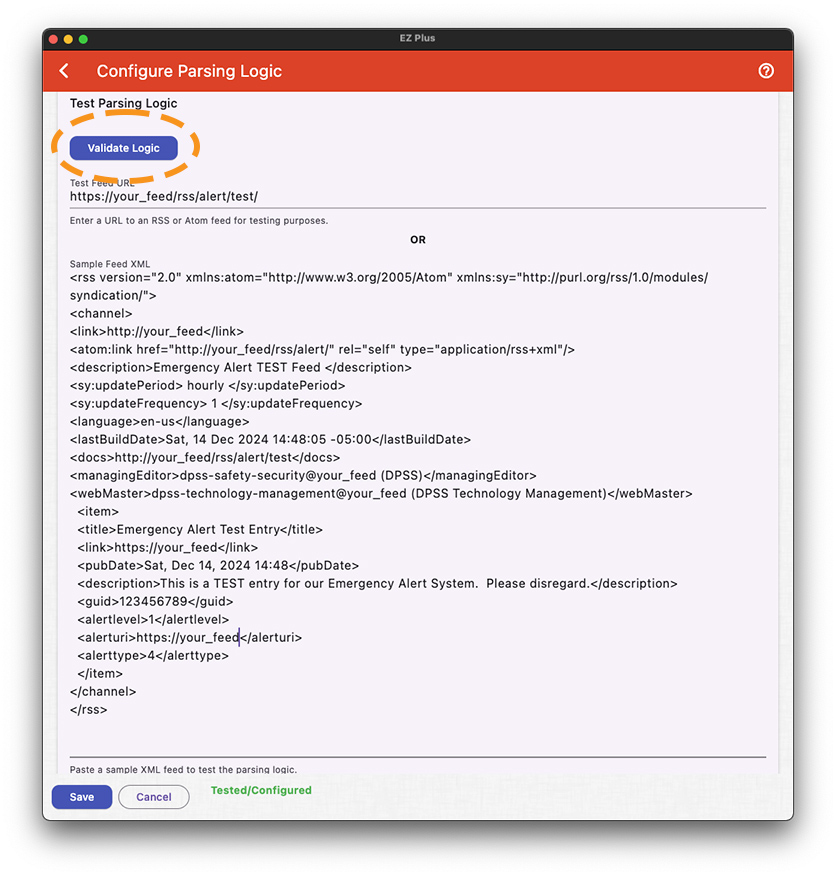
7- Let’s look into testing and configuring an alert source. Our default configuration and parsing logic should work for most RSS/ATOM feeds, so there is a good chance that you don’t need to do much in this section. But to make sure of that, you should put either the alert source URL with an active alert item in the “Test Feed URL” or put a sample output of the feed in the “Sample Feed XML” and press “Validate Logic”. If we can parse everything correctly, you will see a dialog box appear confirming title/description/id of the alert extracted from the feed. Figure 7.a shows such a scenario where the Sample
Feed XML is automatically populated from the test feed url.
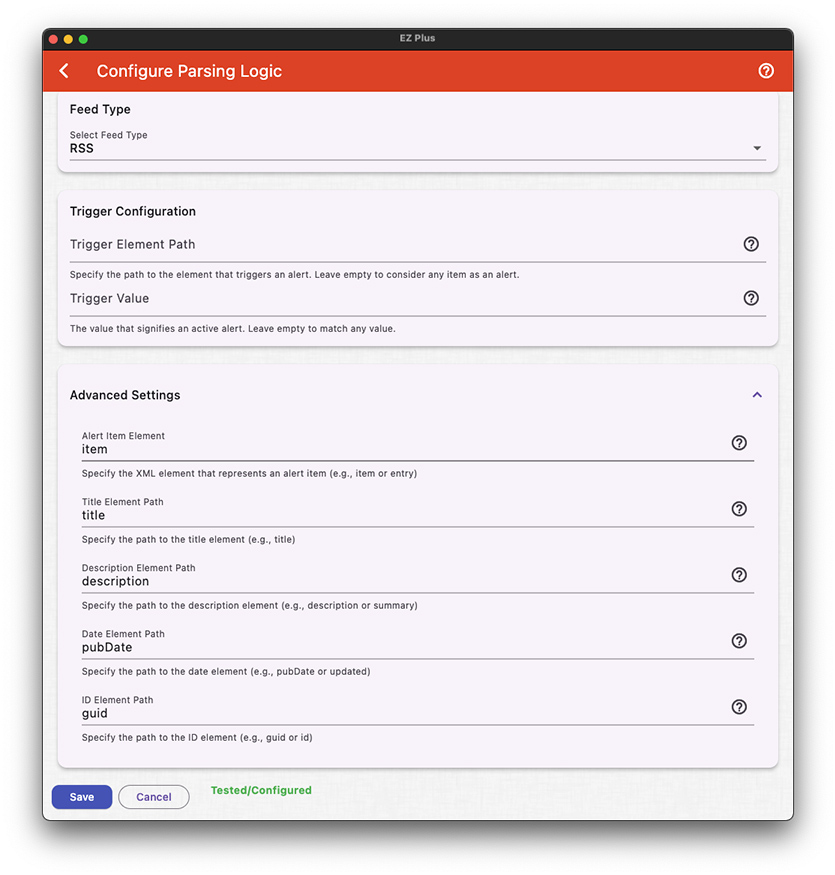
If the default configuration does not work for your feed, you can customize how the feed items are parsed and when an alert should be triggered from the feed . The default behaviour is that every active item of the feed is considered an active alert unless you change the “Trigger Configuration”, which has Trigger Element Path and Trigger Value parts. Lets cover this with an example.
Let’s say your RSS feed contains the following:
<rss version=”2.0″ xmlns:atom=”http://www.w3.org/2005/Atom” xmlns:sy=”http://purl.org/rss/1.0/modules/syndication/”>
<channel>
<link>http://your_feed</link>
..
<managingEditor>dpss-safety-security@your_feed (DPSS)</managingEditor>
<webMaster>dpss-technology-management@your_feed (DPSS Technology Management)</webMaster>
<item>
<title>Emergency Alert Test Entry</title>
<link>https://your_feed</link>
<pubDate>Sat, Dec 14, 2024 14:48</pubDate>
<description>This is a TEST entry for our Emergency Alert System. Please disregard.</description>
<guid>123456789</guid>
<alertlevel>1</alertlevel>
<alerturi>https://your_feed</alerturi>
<alerttype>4</alerttype>
</item>
</channel>
</rss>
If we set “Trigger Element Path” as “alertlevel” and “Trigger Value” as “1”, the above example will trigger an alert. But if we change the “Trigger Value” to “2”, the above example will not trigger an alert as its alertlevel is 1. Note that everything in the feed is considered to be a text/string.
Similarly, under “Advanced Settings”, you can configure the path to an element of the channel (which is typically “item” in RSS feeds), and for each element in the channel, you can specify the names for the title/description/publication-date/unique-id. If your alert feed does not have a unique id for each alert, don’t worry as EZTV will automatically create an ID for the alert based on its title/description.
Also, when you change the Alert Feed type, we will automatically change the Advanced Settings of the parsing logic with default values for the given feed type.
Finally, don’t forget to save your changes after you are done with testing/configuring your alert source
7.a First test the default logic for triggering an alert and parsing for your feed
7.b And if you don’t like the default behavior, you can configure the process
Here’s a very old, and outdated, installation video that gives you an idea of how easy it is to install and use EZ Plus.
Do not use this video for setup purposes.
